We’ve all been there – you’re getting ready for a workout, a long commute, or just some leisurely listening, and you grab your trusty JLab earbuds only to find they’re not charged.
You thought you had plugged them in before bed or right after your last use, but here they are, lifeless and unresponsive. But worry not, we’ve got you covered!
In this article, we’ll go over some common reasons why your JLab earbuds might not be charging properly and provide step-by-step guidance on how to fix them.
So let’s dive in and figure out what’s going on with those pesky earbuds!
Contents
- 1 Root Cause of JLab Earbuds Not Charging
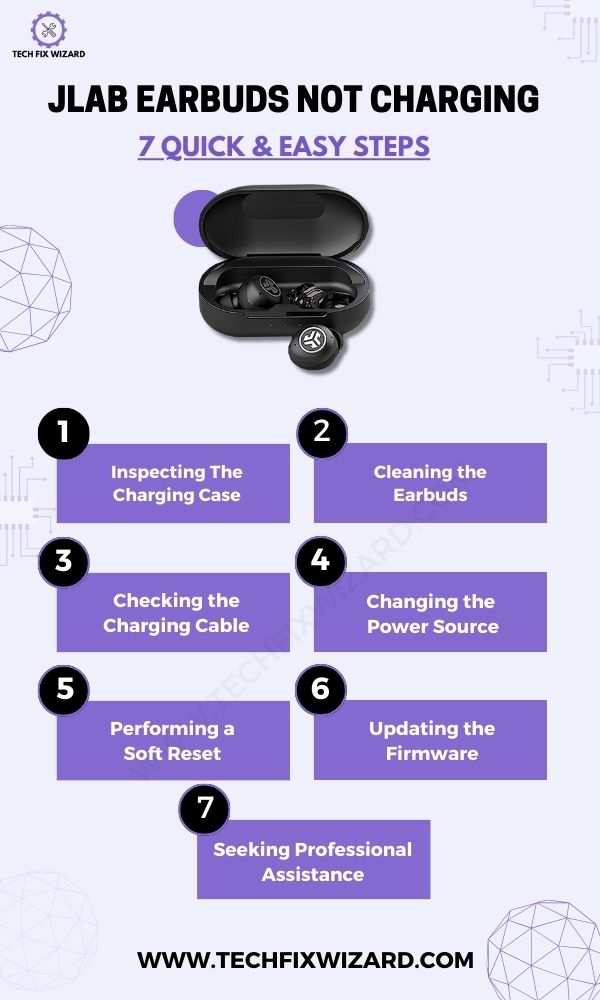
- 2 Troubleshooting Jlab Earbuds Not Charging Issue – 7 Easy Steps
- 3 1. Inspecting The Charging Case
- 4 2. Cleaning the Earbuds and Charging Contacts
- 5 3. Checking the Charging Cable
- 6 4. Changing the Power Source
- 7 5. Performing a Soft Reset on the Earbuds
- 8 6. Updating the Firmware
- 9 7. Seeking Professional Assistance or Warranty Claims
- 10 FAQs
- 11 1. How can I update the firmware of my JLab earbuds?
- 12 2. Why are my JLab earbuds not charging?
- 13 3. How do I clean my JLab earbuds?
- 14 4. What should I do if my JLab earbuds are not connecting to my device?
- 15 5. How do I control the playback functions on my JLab earbuds?
- 16 6. What should I do if one of my JLab earbuds is not working?
- 17 7. Can I use my JLab earbuds during workouts or in wet conditions?
- 18 8. How do I check the battery level of my JLab earbuds?
- 19 9. Why is updating the firmware important for my Jlab earbuds?
- 20 Conclusion
Root Cause of JLab Earbuds Not Charging
When encountering a situation where your JLab earbuds are not charging, it’s crucial to first identify the root cause of the problem. Inspect for any visible damage such as:
- Bent connectors
- Frayed cables
- Dents in the case
| Step | Description |
|---|---|
| 1 | Ensure both your earbuds and charging case are clean and free from dirt and debris that could obstruct charging connections. |
| 2 | Verify that you are using an appropriate charger (preferably the one provided by JLab) and a functioning USB cable. |
| 3 | Try connecting the charger to different power outlets or USB ports to check for any issues with the power source. |
| 4 | Assess compatibility between the charger and the charging case, as some chargers may not provide sufficient power output for certain devices. |
Troubleshooting Jlab Earbuds Not Charging Issue – 7 Easy Steps
Following are the 7 steps to troubleshoot the Jlab earbuds not charging issue. Let’s get started!
1. Inspecting The Charging Case
It’s crucial to ensure that the charging case is functioning properly, as this plays a significant role in your JLab earbuds charging process.
A faulty or damaged case can prevent your earbuds from receiving the necessary power. To inspect the charging case and identify any issues, follow these steps:
| Step | Description |
|---|---|
| 1 | Carefully examine the exterior of the case for any visible signs of damage such as cracks, dents, or broken hinges. |
| 2 | Check the interior of the case and ensure the charging contacts are clean and free from debris or corrosion. |
| 3 | Verify if the charging indicator light on the case is functioning when connected to a power source. It should turn on if receiving power. |
Also Read:
- TOZO Earbuds Not Charging – Try These Effective Solutions
- How to Charge Raycon Earbuds Without the Case – Ingenious DIY Charging Hacks
2. Cleaning the Earbuds and Charging Contacts
The second step for addressing the issue of JLab earbuds not charging is to inspect and clean the earbuds and their charging contacts.
Over time, dirt, debris, and sweat can accumulate on the earbuds’ surface and interfere with the charging process.
| Step | Description |
|---|---|
| 1 | Use a soft, dry cloth to wipe away visible dirt or grime from the earbuds. |
| 2 | For stubborn residue, dampen the cloth with a small amount of rubbing alcohol and gently clean the earbuds, avoiding moisture in openings or crevices. |
| 3 | Clean the charging contacts on both the earbuds and the charging case using a cotton swab dipped in rubbing alcohol.
This removes oxidation or grime that may interfere with a secure connection during the charging process. |
| 4 | Allow all components to dry completely before reassembling and attempting to charge the earbuds again. Ensure they are thoroughly dry to prevent any damage or malfunctions. |
Watch the video to see how to clean your earbuds and it’s the case. It’s a general video and the process is overall the same.
Read Blog Posts: Haylou GT1 Pro Not Charging – 11 Easy Steps To Restore Charging
3. Checking the Charging Cable
To check the charging cable, follow the steps given below:
| Step | Description |
|---|---|
| 1 | Disconnect the charging cable from both the charging case and the power source. Examine the cable for any signs of damage such as fraying or bent connectors. |
| 2 | If visible damage is present, consider getting a replacement cable that is compatible with your JLab earbuds. |
| 3 | If available, try using an alternative USB-C or micro-USB cable to charge your earbuds and monitor for any improvements in charging capacity. |
4. Changing the Power Source
When your earbuds are not charging properly, changing the power source can be an important troubleshooting step to consider. Here’s why:
| Possible Causes | Description |
|---|---|
| Outlet or USB Port Issues | The power source being used, such as a faulty wall outlet or malfunctioning USB port, could be the cause of the charging problem. Changing to a different power source helps identify the source of the issue. |
| Insufficient Power Output | Some power sources may not provide enough power for effective charging, resulting in slow or no charging. Switching to a higher-power source can overcome this limitation. |
| Compatibility with Fast Charging | Not all chargers or USB ports support fast charging. Using a power source known for fast charging capabilities is crucial for earbuds that support this feature. |
| Charging Cable Problems | A damaged or faulty charging cable can also hinder the charging process. Trying a different cable while changing the power source helps rule out cable-related issues. |
5. Performing a Soft Reset on the Earbuds
If you have ruled out all the above troubleshooting steps and your earbuds are still not charging, then it’s time to perform a soft reset on the earbuds.
This process can rectify any minor software glitches or bugs that might be preventing your JLab earbuds from charging properly.
To perform a soft reset, follow these steps meticulously:
- Make sure that your earbuds are in the charging case.
- On your phone or device, forget the JLab earbuds from your Bluetooth settings.
- Quickly tap the touch sensor on one earbud 7 times. The light should blink blue 3 times.
- Repeat step 3 with the other earbud.
- Take both earbuds out of the charging case.
- Wait for one earbud to turn solid white and one to blink blue/white.
- Your JLab earbuds are now reset.
Make sure that your earbuds are fully charged before resetting them.
Also Read:
- Jabra 65t Not Charging – 9 Essential Steps to Follow
- Powerbeats Pro Case Not Charging – 16 Solutions To The Rescue
6. Updating the Firmware
After attempting all the aforementioned troubleshooting steps without success, there is one final option to consider which is updating the firmware of your earbuds.
- Make sure that your earbuds are fully charged and that they are paired to your device.
- Download the latest JLab Audio app from the App Store or Google Play.
- Open the JLab Audio app and sign in to your account.
- If there is a firmware update available, the app will prompt you to update.
- Tap “Update” to begin the update process.
- The update process will take a few minutes to complete.
- Once the update is complete, your earbuds will restart.
If you’re still experiencing issues after trying these steps, don’t hesitate to reach out to JLab’s customer support team; they’re more than happy to help resolve any lingering problems.

7. Seeking Professional Assistance or Warranty Claims
If you’ve tried all of the troubleshooting methods mentioned above, and your JLab earbuds are still not charging, it might be time to seek professional assistance or look into warranty claims.
In some cases, internal components may have been damaged or worn out, requiring specialized intervention.
When speaking with customer support representatives, be prepared with information about your earbuds’ purchase date, model number, and a detailed account of the problem at hand.
This information will help them better understand your situation and guide you in the right direction.
Read Blog Posts: Yobola T2 Pro Not Charging – Try These 9 Easy Solutions [FIXED]
FAQs
1. How can I update the firmware of my JLab earbuds?
Visit JLab’s official website, go to the support page, and follow the instructions provided to download and install the latest firmware.
2. Why are my JLab earbuds not charging?
There could be various reasons, including issues with the charging cable, power source, or charging contacts. Follow the troubleshooting steps mentioned above to identify and resolve the problem.
3. How do I clean my JLab earbuds?
Use a soft, dry cloth to wipe away dirt and grime from the exterior. For stubborn residue, lightly dampen the cloth with rubbing alcohol. Avoid getting moisture into any openings or crevices.
4. What should I do if my JLab earbuds are not connecting to my device?
Ensure your earbuds are in pairing mode and near your device. Try resetting the earbuds, clearing the device’s Bluetooth cache, and making sure the earbuds are not already connected to another device.
5. How do I control the playback functions on my JLab earbuds?
Most JLab earbuds have touch controls or physical buttons to play/pause music, skip tracks, and adjust the volume. Refer to the user manual or JLab’s website for specific instructions related to your earbud model.
6. What should I do if one of my JLab earbuds is not working?
Try resetting the earbuds, ensuring they are fully charged, and cleaning the charging contacts. If the problem persists, contact JLab customer support for further troubleshooting or possible warranty options.
7. Can I use my JLab earbuds during workouts or in wet conditions?
Many JLab earbuds are designed for sports and have sweat or water resistance. Check the IP rating and product specifications of your specific model to determine its suitability for workouts or wet environments.
8. How do I check the battery level of my JLab earbuds?
Some JLab earbuds have LED indicators that display the battery level when they are in use or charging. You can also check the battery level through the companion app, if available.
9. Why is updating the firmware important for my Jlab earbuds?
Updating the firmware ensures optimal performance, resolves potential charging problems, and keeps your earbuds up-to-date with the latest enhancements and bug fixes.
Conclusion
In conclusion, it’s important to thoroughly inspect and maintain your JLab earbuds to ensure they charge properly. By following the steps provided, you should be able to identify and fix any issues that may arise.
Remember, regular cleaning of your earbuds and charging contacts can save you from potential charging problems in the future.
If all else fails, don’t hesitate to seek professional assistance or explore warranty claims for your JLab earbuds.

John Paul is a tech enthusiast dedicated to troubleshooting. He is passionate about fixing glitches, simplifying complexities, and empowering others in the digital realm.