When your Oculus Quest isn’t charging as it should, it can be frustrating. This guide is here to help you fix the issue.
In this article, we’ll provide step-by-step solutions to get your Oculus Quest charging again. Let’s start troubleshooting and get back on track
Contents
- 1 Fixing Oculus Quest Not Charging – 13 Steps To Troubleshoot
- 2 1. Replug the Charger
- 3 2. Leave it on Charge for a While
- 4 3. Check the Battery Level
- 5 4. Make Sure the Power Source Is Functional
- 6 5. Check the USB-C Cable & AC Wall Adapter
- 7 6. Try a Different USB-C Cable
- 8 7. Check the Charging Port
- 9 8. Clean the Charging Port
- 10 9. Cool Down Your Device
- 11 10. Deactivate Auto Wake-Up Feature
- 12 11. Perform a Hard Reboot
- 13 12. Factory Reset (Last Resort)
- 14 13. Contact Oculus Support
- 15 FAQs
- 16 1. What do I do if my Oculus stops charging?
- 17 2. Why is the red light not charging on my Oculus Quest?
- 18 3. Why won’t my Oculus turn on and charge?
- 19 4. How do I know if my Oculus is charging?
- 20 5. Does the red light on Oculus mean it’s charging?
- 21 6. What is the red light charge on the Oculus?
1. Replug the Charger
Begin by disconnecting and then reconnecting the charger to the headset. Sometimes, a simple reconnection can resolve minor issues.
Also Read: Oculus Quest 2 Not Updating – 9 Quick & Easy Steps To Troubleshoot
2. Leave it on Charge for a While
After reconnecting the charger, allow the headset to remain on charge for a while. Charging might not immediately start, so it’s essential to be patient.
Sometimes, the battery is so drained that it does not have enough power to light the LEDs that indicate the battery is charging.
Waiting for a while will help the battery to charge up sufficiently to light the LEDs. If the headset still doesn’t charge after some time, proceed to the following troubleshooting steps.

3. Check the Battery Level
Next, check the battery status using the Oculus App. Sometimes, a faulty LED can lead to confusion, making you think it’s not charging as expected.
To rule out such confusion, it’s better to verify the battery status.
- Open the Oculus app on your phone (iOS Or Android)
- Go to settings
- Tap the headset or controller icon that you want to check the battery level for.
- The battery level will be displayed below the device name.
4. Make Sure the Power Source Is Functional
One of the crucial steps is to verify the functionality of the power source. Ensure that the power source you’re using to charge your Oculus Quest is working correctly.
You can do this by trying the following:
- Test with Other Devices: Plug another device into the same power source to verify if it can charge that device. This helps determine if the issue lies with the power source or the Oculus Quest itself.
- Reset the Circuit Breaker: If you’re using an electrical outlet, consider resetting the circuit breaker for that outlet, as it may have tripped.
- Try an Alternative Power Source: If you suspect a problem with the power source, use an alternative outlet or a different power adapter to charge your Oculus Quest.
5. Check the USB-C Cable & AC Wall Adapter
Next, inspect the USB-C cable for any visible damage or signs of wear and tear. If the cable appears damaged, it might be the root of the problem.
Additionally, ensure that the AC wall adapter is functioning correctly. You can do this by testing it with another device to confirm it’s delivering power as expected.
To rule out a loose connection, gently wiggle the cable where it connects to the headset.
Also, experiment by plugging the charging cable into a different USB power adapter or computer to determine if it charges correctly from an alternative power source.
6. Try a Different USB-C Cable
If the original charging cable seems damaged or isn’t working, switch to a different, known-working USB-C cable.
It’s essential to make sure that the replacement cable is in good condition and not damaged, as a faulty cable can prevent proper charging.
7. Check the Charging Port
If you have ruled out all the above factors, the next most likely culprit can be a faulty charging port, so take some time to thoroughly inspect it.
Inspect it for any physical damage or debris that might be obstructing the connection. Physical damage to the charging port can hinder the charging process.
If you discover any damage, it’s crucial to contact Oculus support for assistance or to arrange for a replacement, as this is not a user-serviceable issue.
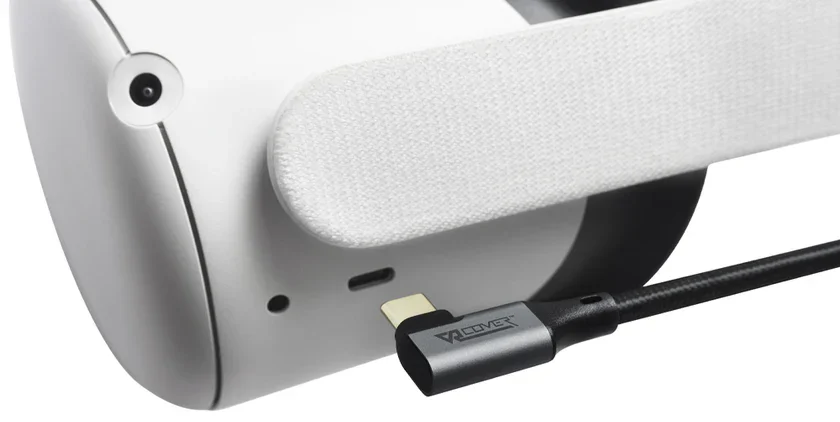
8. Clean the Charging Port
If you find that there is an obstruction due to dirt and debris, then consider cleaning it. It’s a very simple process.
To clean the charging port of the Oculus Quest, you will need:
- A can of compressed air
- A wooden toothpick or other non-metallic object
Instructions:
- Turn off your Oculus Quest and unplug it from the charger.
- Use the can of compressed air to blow out any dust or debris from the charging port.
- If there is any stubborn debris, you can use the wooden toothpick or other non-metallic object to gently scrape it out.
- Once the charging port is clean, plug your Oculus Quest back in to charge.
9. Cool Down Your Device
If the Oculus headset feels excessively hot to the touch, it could suggest an overheated battery. In such cases, turn off the headset by holding down the Power button for approximately 5 seconds until it shuts down.
Allow the headset to cool down for about 30 minutes before attempting to charge it again. After the cooling period, plug in the charging cable and check if it starts charging.
Overheating can occasionally hinder the charging process, and allowing it to cool down might resolve the issue.
Also Read: Oculus Quest 2 Not Connecting To PC – Troubleshoot With 13 Proven Steps
10. Deactivate Auto Wake-Up Feature
The auto wake-up feature activates when an object is nearby, and it consumes a considerable amount of battery, resulting in the Oculus overheating.
Consider disabling this feature to alleviate the strain on your device; doing so may also help resolve the charging issue.
To deactivate the auto wake-up feature:
Go from Setting > See All > Power > Auto Wake Headset.
After deactivating it, try plugging in the charger to see if it is now charging.
11. Perform a Hard Reboot
Try rebooting your device; it effectively clears the software glitches that might be causing the charging issues.
To perform a hard reboot:
- Power off the Oculus headset first.
- Then, press and hold both the Power and Volume Down buttons simultaneously for about 3 seconds.
- This action will trigger the headset to enter Update Mode.
- Use the volume buttons to select the “Boot Device” option and press the Power button to confirm.
The Oculus headset will restart normally, and this process won’t result in any data loss.
If even after rebooting, your headset refuses to charge, then consider performing a factory reset.
12. Factory Reset (Last Resort)
While performing a factory reset can be highly effective in resolving issues with your Oculus headset, it’s crucial to resort to it only as a last option, considering the potential downside of data loss.
This process results in the loss of all your media data, including screenshots and recordings, which cannot be recovered.
On the upside, your games and purchases will be restored after reconnecting to your Facebook or Meta account.
To factory reset your Oculus Quest:
- Locate the volume down button on the left underside.
- Find the power button on the right side.
- Simultaneously press and hold the volume down and power buttons for 15-45 seconds.
- Access the menu.
- Highlight “Factory Reset” using volume buttons.
- Confirm by pressing the power button.
- Select “Yes, erase all.”
- Confirm again to initiate the reset.
13. Contact Oculus Support
If none of the above troubleshooting steps resolve the issue, it’s advisable to contact Oculus support for further assistance and guidance.
They can provide specific guidance tailored to your situation and offer further troubleshooting or potential solutions to the charging problem.
FAQs
1. What do I do if my Oculus stops charging?
If your Oculus stops charging, first ensure that the charging cable and power source are working correctly. Try a different cable or adapter if necessary.
You can also reboot your headset to clear any software issues that may be affecting the charging process.
2. Why is the red light not charging on my Oculus Quest?
The red light on your Oculus Quest indicates it’s charging. If the red light is not on, it might suggest an issue with the cable, adapter, or charging port on your headset.
Check these components for any damage or debris that might be blocking the connection.
3. Why won’t my Oculus turn on and charge?
If your Oculus doesn’t turn on or charge, it could be due to a dead battery or a charging issue. Make sure you’re using a functional cable and adapter. Reboot the headset, and if the problem persists, consider performing a factory reset as a last resort.
4. How do I know if my Oculus is charging?
You can tell if your Oculus is charging when a red LED light appears on the headset. This red light indicates the charging process is active. If you don’t see the red light, there might be an issue with the charging components.
5. Does the red light on Oculus mean it’s charging?
Yes, the red light on Oculus does mean it’s charging. When you plug in your headset, this red LED signifies that it’s receiving power and is in the charging state.
6. What is the red light charge on the Oculus?
The red light on the Oculus is an indicator that your headset is charging. It’s a visual cue that the battery is being replenished, showing that the device is in the process of recharging.

John Paul is a tech enthusiast dedicated to troubleshooting. He is passionate about fixing glitches, simplifying complexities, and empowering others in the digital realm.