Struggling with your Oculus Quest 2 refusing to connect to your PC? Fret not!
In this guide, we’ll walk you through step-by-step solutions to tackle Oculus Quest 2 not connecting to PC issue and ensure you get back to enjoying your VR experiences without a hitch.
Contents
- 1 13 Ways To Fix Oculus Quest 2 Not Connecting To PC
- 2 1. Verify PC Specifications
- 3 2. Inspect the USB Cable and Port
- 4 3. Restart Oculus Quest 2
- 5 4. Sign Out and Sign Back Into Your Account
- 6 5. Restart Your PC
- 7 6. Update Oculus Software
- 8 7. Update GPU Drivers
- 9 8. Disable Security Software
- 10 9. Check USB Power Management
- 11 10. Disable Air Link
- 12 11. Verify Oculus Link Settings
- 13 12. Check USB Drivers
- 14 13. Perform a Factory Reset (Last Resort)
- 15 FAQs
- 16 1. Why isn’t my Quest 2 connecting to my PC?
- 17 2. Why is my Oculus Quest 2 not connecting to my PC using Air Link?
- 18 3. Why is my Meta Quest 2 unable to connect to my headset?
- 19 4. How do I fix the Oculus Link not working on Quest 2?
- 20 5. Why won’t my VR headset connect?
- 21 6. How do I connect Quest 2 to my PC?
- 22 7. How do I connect my Oculus to my PC?
- 23 8. Should I connect Quest 2 to the PC?
- 24 9. How do I connect my VR to my laptop?
- 25 10. How do I enable Link in Oculus Quest 2?
- 26 11. How do I activate the Oculus Link on Quest 2?
13 Ways To Fix Oculus Quest 2 Not Connecting To PC
Let’s dive into the range of solutions to fix the connectivity problem with your Oculus Quest.
1. Verify PC Specifications
When troubleshooting connectivity issues with Oculus Quest 2, it’s crucial to confirm that your PC meets the minimum specifications required for Oculus Link. The following are key components to examine.
- GPU – Ensure that your GPU (Graphics Processing Unit) is capable of handling VR applications. Oculus generally recommends a dedicated GPU equivalent to or better than an NVIDIA GTX 970 or an AMD Radeon R9 290.
- CPU – Oculus recommends minimum requirement for the CPU is at least an Intel i5-4590 or an AMD Ryzen 5 1500X.
- RAM: Lastly, check your RAM. Oculus typically recommends 8GB or more for a smooth VR experience.
If your PC falls short in any of these areas, consider upgrading to meet or exceed Oculus recommendations. Upgrading hardware might be necessary for optimal performance.
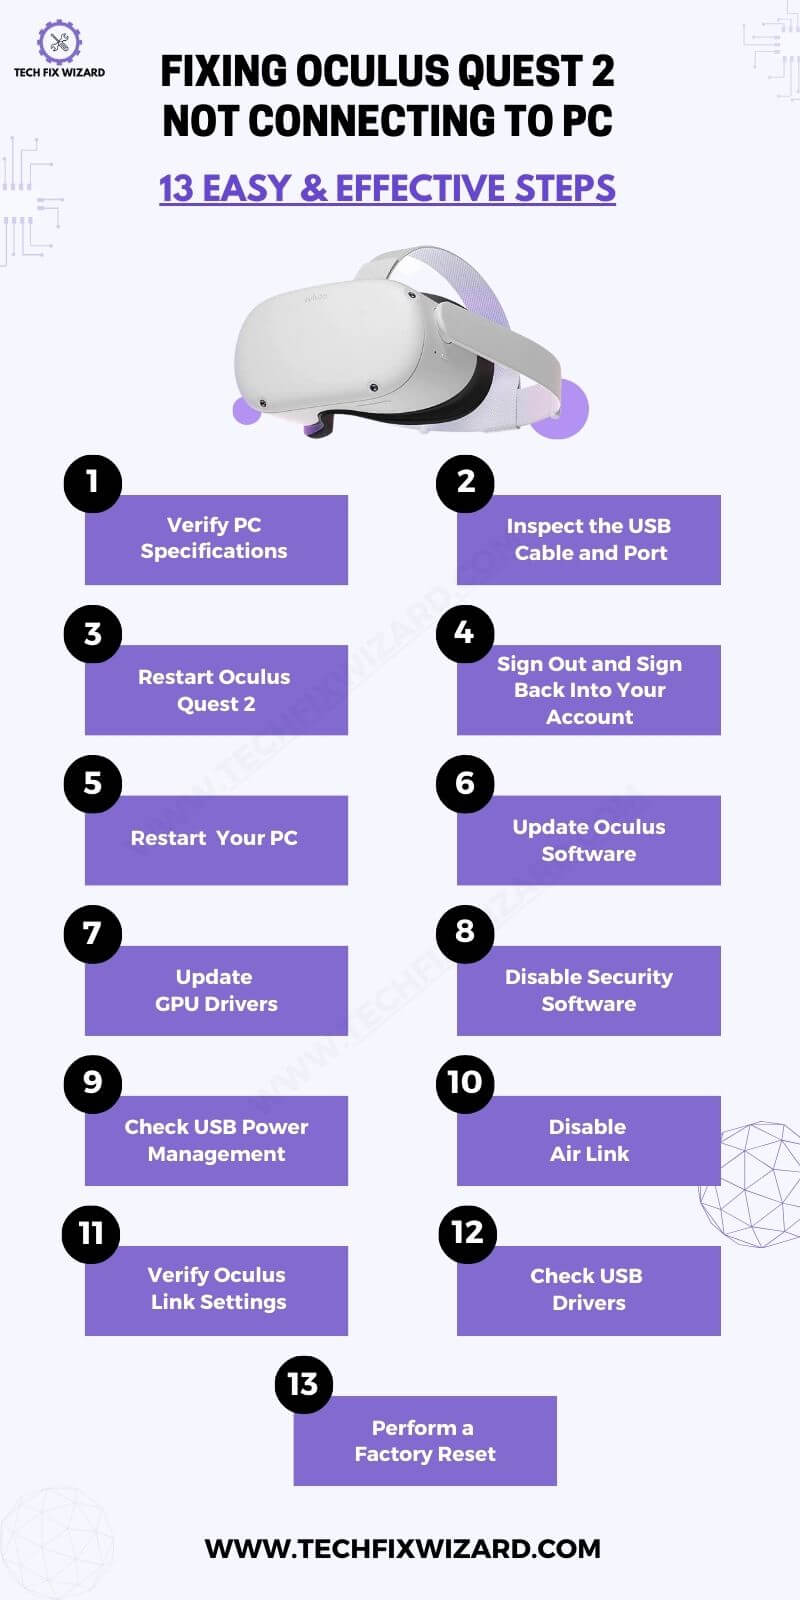
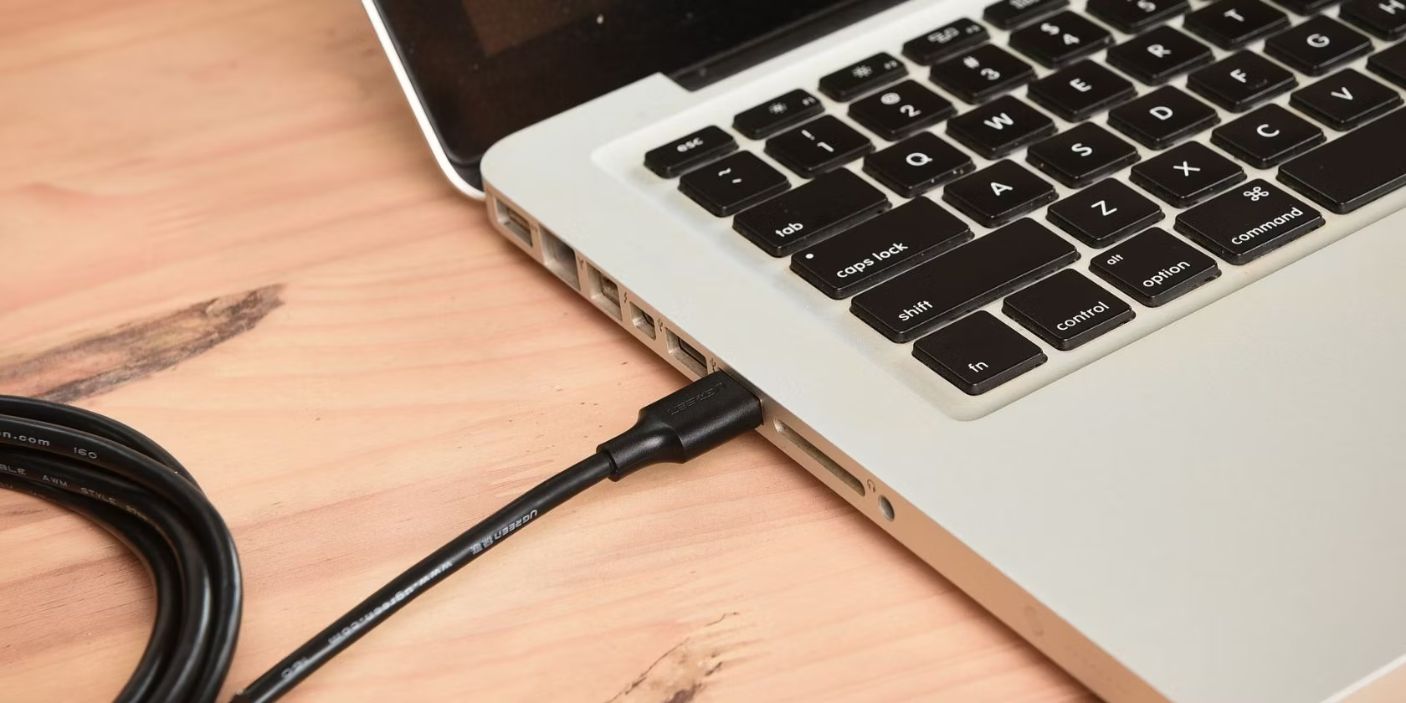
2. Inspect the USB Cable and Port
A damaged or frayed USB cable can impede a stable connection between your Oculus Quest 2 and your PC. Ensure the USB cable is in good condition, with no visible damage to the wires or connectors.
Experiment with different USB cables to rule out any cable-related issues. Explore various USB ports on your PC, paying special attention to USB 3.0 ports.
Oculus Link benefits from the higher data transfer rates of USB 3.0, which can enhance the overall VR experience. USB 3.0 ports are often marked with a blue color.
3. Restart Oculus Quest 2
Performing a power cycle on your Oculus Quest 2 can resolve minor glitches and refresh the device’s internal state.
- Power off your Oculus Quest 2 completely.
- Wait for a few seconds to ensure all processes are terminated.
- Then, power the headset back on.
This simple action can address temporary issues that might be hindering the connection between your Oculus Quest 2 and PC. It’s a quick and effective troubleshooting step that often resolves connectivity problems.
Also Check:
- Oculus Quest Not Charging – 13 Steps To Resolve It
- Oculus Casting Not Working – 12 Steps To Get It Working Again
4. Sign Out and Sign Back Into Your Account
Logging out and back into your Oculus account within the Oculus software on your PC can refresh the connection.
This action essentially resets your account connection, addressing any potential authentication or authorization issues that may be affecting the connection between your Oculus Quest 2 and PC.
After signing back in, attempt to connect your Oculus Quest 2 to your PC and check if the issue persists.
5. Restart Your PC
Performing a restart on your PC serves as a crucial step in troubleshooting Oculus Quest 2 connectivity issues. This action facilitates a USB connection reset, refreshing USB connections, and system settings.
Restarting your PC helps clear temporary glitches that might be affecting the USB ports or overall system performance. Ensure that your Oculus Quest 2 is disconnected before restarting your PC.
After the restart, attempt to reconnect your Oculus Quest 2 to your PC to see if the issue is resolved. This simple yet effective step often resolves USB-related problems, providing a clean slate for the Oculus Link connection.
6. Update Oculus Software
Regularly updating the Oculus software is crucial for maintaining compatibility with the Oculus Quest 2. Therefore, during the troubleshooting process, pay attention to whether an outdated version of the software is causing the issue.
Install updates regularly to ensure that your Oculus software is synchronized with the latest features and bug fixes. An outdated software version may lead to compatibility issues with the Oculus Quest 2.
To update the software follow the steps below:
- Go to the home page on your Oculus Quest 2 headset.
- Press the Oculus button on the right controller to open the menu.
- Click on the settings icon at the end of the menu bar.
- Access the settings panel.
- Select “System Settings” from the options.
- Choose “Software Update” on the left side of the menu.
- Check for available updates for your Oculus headset.
- If updates are available, proceed with the update.
By keeping the Oculus software up to date, you enhance the likelihood of a smooth and stable connection between your PC and the VR headset.
7. Update GPU Drivers
Ensuring that your GPU drivers are up to date is essential for a seamless VR experience. Visit the official website of your GPU manufacturer, whether it’s NVIDIA or AMD, and download the latest graphics card drivers compatible with your GPU model.
Regularly updating your GPU drivers not only improves performance but also addresses compatibility issues that may arise with new software updates, including those from Oculus.
After updating, restart your PC and try connecting your Oculus Quest 2 again.
8. Disable Security Software
Temporarily disabling antivirus or firewall software is a strategic step to identify whether these security measures are causing interference with the Oculus Quest 2 connection.
Disable your security software temporarily and attempt to connect your Oculus Quest 2 to your PC. If the connection works without the security software enabled, adjust the settings or add exceptions to allow Oculus and its associated applications.
Ensure that your security software is configured to permit the necessary data flow for Oculus Link to function smoothly.
9. Check USB Power Management
USB power management settings on your PC can impact the stability of your Oculus Link connection. Disable USB selective suspend in your PC’s power management settings to prevent USB ports from entering power-saving modes.
This step ensures that USB ports remain active and responsive, reducing the likelihood of disconnection or data transfer issues.
Adjusting these power settings is particularly relevant for maintaining a consistent and reliable connection between your Oculus Quest 2 and PC.
10. Disable Air Link
While Air Link is a valuable feature, disabling it temporarily can help troubleshoot connectivity issues with Oculus Link. Turn off Air Link on both the Oculus Quest 2 and the Oculus PC software to eliminate potential conflicts.
After disabling the Air Link, retry connecting via Oculus Link. This step helps isolate the issue and determines whether the problem lies with Air Link or if there are broader connectivity issues.
If successful, you can then explore specific settings or updates related to Air Link for a more informed resolution.
11. Verify Oculus Link Settings
Open the Oculus app on your PC and navigate to “Settings” to ensure that your Oculus Link settings are configured correctly. Confirm that the selected headset is the correct one, as having the wrong headset selected can lead to connection issues.
Check that the video and audio settings align with your preferences, and verify that Oculus Link is recognized as the connection method.
Ensuring the correct settings are in place contributes to a seamless and optimized Oculus Link experience
12. Check USB Drivers
Ensure that the USB drivers on your PC are up to date. USB drivers play a crucial role in the communication between your Oculus Quest 2 and PC. Outdated or incompatible drivers can lead to connection issues.
Check the manufacturer’s website for your motherboard or USB controller to download and install the latest USB drivers. If issues persist, consider reinstalling the USB drivers to establish a fresh and reliable connection.
13. Perform a Factory Reset (Last Resort)
As a last resort, consider performing a factory reset on your Oculus Quest 2. Keep in mind that this is an extreme measure, and it will erase all data on the headset, including installed apps and settings.
Performing a factory reset should only be considered if all other troubleshooting steps have failed to resolve the connectivity issue.
Ensure you have backed up any important data before proceeding with a factory reset. Next:
- Find the volume down button (left, near nose cavity) and power button (right side) on Quest 2.
- Simultaneously press and hold the volume down and power buttons for 15-45 seconds.
- A menu appears; use volume buttons to highlight “Factory Reset.”
- Confirm by pressing the power button twice.
After the reset, reconnect your Oculus Quest 2 to your PC and check if the problem persists.
FAQs
1. Why isn’t my Quest 2 connecting to my PC?
There could be several reasons for this issue. Ensure that you have the Oculus software installed on your PC and that your Quest 2 firmware is up to date.
Check your USB cable for any damage, and try using a different USB port on your PC.
Additionally, restart both your PC and Quest 2, and make sure your USB drivers are updated.
2. Why is my Oculus Quest 2 not connecting to my PC using Air Link?
If Air Link is not working, make sure that your PC and Quest 2 are on the same Wi-Fi network, and that your PC meets the Air Link system requirements.
Restart both your PC and Quest 2, and try disabling and re-enabling Air Link in the Oculus software settings.
3. Why is my Meta Quest 2 unable to connect to my headset?
If your Meta Quest 2 is not connecting to the headset, check if the headset is powered on and within range. Ensure that Bluetooth is enabled on your device, and try restarting both the headset and your Meta Quest 2.
4. How do I fix the Oculus Link not working on Quest 2?
To fix Oculus Link issues, ensure your USB cable is in good condition and try using a different USB port.
Make sure your graphics drivers are up to date, and restart both your PC and Quest 2.
You may also want to try opting into the Oculus Public Test Channel for the latest updates.
5. Why won’t my VR headset connect?
Troubleshooting VR headset connection issues involves checking cables, and USB ports, and ensuring that your headset is properly powered on. Check for firmware updates for both your headset and any associated software on your PC.
6. How do I connect Quest 2 to my PC?
To connect your Quest 2 to your PC, you need to use a compatible USB cable. Connect one end to your PC and the other to the USB-C port on your Quest 2. Follow the on-screen instructions in the Oculus software to complete the setup.
7. How do I connect my Oculus to my PC?
Connect your Oculus headset to your PC using a compatible USB cable and follow the on-screen instructions in the Oculus software for the setup process. Make sure your PC meets the recommended system requirements.
8. Should I connect Quest 2 to the PC?
Connecting your Quest 2 to a PC enables you to access a wider range of games and experiences, often with higher graphics quality. If you want to explore PC VR content, connecting your Quest 2 to a PC is recommended.
9. How do I connect my VR to my laptop?
Connect your VR headset to your laptop using the appropriate cable. For Oculus headsets, this often involves using a USB cable. Ensure your laptop meets the VR system requirements, and follow the setup instructions provided by the VR platform.
10. How do I enable Link in Oculus Quest 2?
To enable Oculus Link on Quest 2, connect your headset to your PC using a compatible USB cable. Open the Oculus app on your PC, go to Settings, and enable Oculus Link. Follow the on-screen instructions to complete the setup.
11. How do I activate the Oculus Link on Quest 2?
Activate the Oculus Link on Quest 2 by connecting the headset to your PC with a compatible USB cable. Open the Oculus app on your PC, go to Settings, and enable Oculus Link. Follow any additional instructions to complete the activation process.

John Paul is a tech enthusiast dedicated to troubleshooting. He is passionate about fixing glitches, simplifying complexities, and empowering others in the digital realm.