Experiencing the issue of your Roborock not charging can be frustrating.
In this comprehensive guide, we will explore the common reasons behind your Roborock’s charging problems and provide effective solutions to help you restore its smooth operation.
Let’s dive in together and tackle this issue head-on.
Contents
- 1 Fixing Roborock Not Charging – 10 Steps
- 2 1. Check the Wall Outlet
- 3 2. Examine the Power Cable
- 4 3. Power Cycle The Robot Vacuum & the Charging Dock
- 5 4. Verify the Station’s Indicator Light
- 6 5. Realign the Charging Contacts
- 7 6. Inspect Charging Base Pins
- 8 7. Update the Firmware
- 9 8. Replacing Battery
- 10 9. Reset The Roborock Vacuum
- 11 10. Evaluate the Motherboard
- 12 FAQs
- 13 1. Why is my robot cleaner not charging?
- 14 2. How do you manually charge Roborock?
- 15 3. Why is my Roborock not turning on?
- 16 4. Why is my Xiaomi robot vacuum not charging?
- 17 5. How to know if Roborock S7 is charging?
- 18 6. Why does my Roborock not charge on the dock?
- 19 7. My Roborock S7 MaxV Ultra is not charging. What to do?
- 20 8. Why is my Roborock not charging after a reset?
- 21 9. What is error 12 on Roborock?
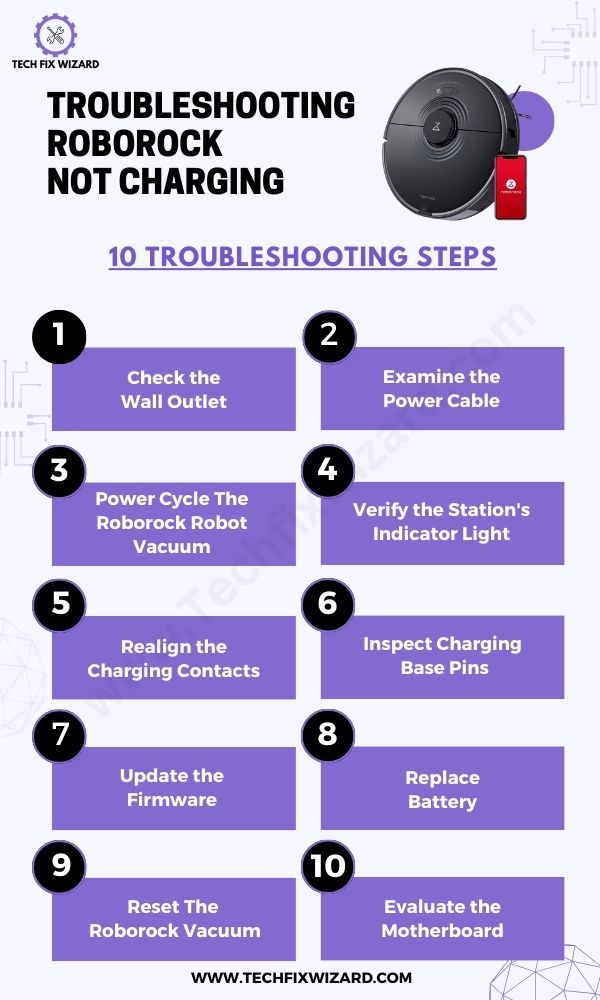
Fixing Roborock Not Charging – 10 Steps
Below, you’ll find a step-by-step guide to troubleshoot and resolve the charging problem with your Roborock vacuum.
These steps will help you get your vacuum cleaner charging properly again.
1. Check the Wall Outlet
Before diving into more complex troubleshooting, start with the basics. Ensure that the wall outlet you’re using for the charging dock is functional.
Plug in another device to confirm that power is being supplied to the outlet. If the outlet is working, move on to the next step.

2. Examine the Power Cable
Inspect the power cable for any visible damage such as frayed wires, cuts, or bent pins. Ensure it’s securely connected to both the charging dock and the wall outlet.
If you find any issues with the cable, replace it immediately to avoid electrical hazards. A faulty cable can disrupt the charging process.
Also Read: Shark Robot Not Connecting To Wi-Fi? 12 Simple Ways To Fix It
3. Power Cycle The Robot Vacuum & the Charging Dock
Power cycling the robot vacuum and charging dock is a valuable troubleshooting step that is worth a try.
It provides a fresh start, clearing temporary glitches and errors in their internal systems.
This process refreshes software, resets minor malfunctions, and enhances overall performance and functionality.
Power Cycling the Robot Vacuum
Follow the steps provided below to power cycle your vacuum:
- Begin by turning off the robot vacuum.
- Next, take out the dust bin from the robot.
- Remove the wheel from the robot.
- Followed by detaching brushes.
- Using a screwdriver, carefully open the battery cover.
- Locate the robot’s battery and proceed to remove it.
- Allow a waiting period of 60 seconds before reinserting the battery and all other components that were previously removed.
Power Cycling the Charging Dock
Now, let’s move on to power cycling the charging station/dock. This is a straightforward process as compared to the above process:
- Start by unplugging the charging dock from the wall outlet.
- Wait patiently for a duration of 60 seconds.
- After the waiting period, plug the charging dock back into the wall outlet.
4. Verify the Station’s Indicator Light
Check the indicator light on the charging station. It’s usually sold as white when it’s ready to charge and off when the robot is docked.
If the light is not as expected, it may indicate a problem with the station or the robot’s docking alignment.
Proceed to the next step for realignment.

Quick Read: Shark Robot Vacuum Not Charging? Here’s What You Need to Do
5. Realign the Charging Contacts
Sometimes, you might have to manually put your robot vacuum on its charging dock. Making sure it’s properly aligned with the charging contacts is crucial for a smooth charging experience.
Here’s how to do it:
- First, turn off your robot vacuum to avoid any sudden movements.
- Put the charging dock on a flat surface close to where your robot usually parks.
- Clear the area around the dock so nothing gets in the way.
Detaching Mop During Charging
If your robot has a mop attachment, take it off for now. Mop attachments can lift the robot slightly, which can mess up the alignment.
Carefully pick up your robot and place it on the charging dock. Make sure the front and back wheels line up with the docking grooves or guides on the charging station.
Now, take a good look to see if the robot is sitting nicely on the dock. Check that the charging contacts on the bottom of the robot are touching the ones on the charging station.

6. Inspect Charging Base Pins
Now, let’s talk about taking a closer look at those tiny but critical pins on your robot vacuum’s charging base. They are responsible for making sure your vacuum gets the juice it needs.
Here’s what you should do:
- First off, make sure the charging base is unplugged.
- Then, get down there and have a good look at those pins.
- Check if any of them seem loose or damaged.
- Loose pins can mess with the whole charging process, and damaged ones can be even worse.
If you do spot any issues with the pins, don’t worry too much. Just reach out to the manufacturer for replacements or repair instructions.
They’ll be able to guide you on what to do next.

Quick Read: Lefant Robot Vacuum Not Charging – 7 Steps To Fix It
7. Update the Firmware
Regularly updating the robot vacuum’s firmware is essential. Manufacturers release updates to fix bugs and improve functionality.
Check the manufacturer’s website or app for the latest firmware and follow their instructions to update your device.
To update your Roborock vacuum, you will need to use the Roborock app or the Xiaomi Home app.
Using the Roborock app:
- Open the Roborock app and tap on the Vacuum icon.
- Tap on the Settings icon (gear icon).
- Tap on Software Update.
- If there is an update available, the app will automatically download and install it.
- Once the update is complete, your Roborock vacuum will restart.
Using the Xiaomi Home app:
- Open the Xiaomi Home app and tap on the Robot Vacuum icon.
- Tap on the Settings icon (gear icon).
- Tap on Software Update.
- If there is an update available, the app will automatically download and install it.
- Once the update is complete, your Roborock vacuum will restart.
8. Replacing Battery
Roborock vacuum cleaners have lithium-ion batteries, similar to those found in our everyday gadgets. Over time, these batteries can wear out, especially with regular use.
When troubleshooting the ‘not charging’ issue, it’s essential to consider this factor, as it might be due to a degraded battery. In such cases, a practical solution is to replace the battery.
For battery replacement:
- Remove the robot from the charging dock.
- Flip the robot over.
- Unscrew eight screws securing the bottom cover.
- Lift and set aside the back cover.
- Disconnect the battery strap.
- Disconnect the battery connector.
- Insert the new battery, ensuring it clicks in place.
- Reassemble the robot by replacing the back cover and screws.
People Also Liked: ECOVACS DEEBOT Not Charging – Effective Troubleshooting & Fixes
9. Reset The Roborock Vacuum
If you’ve tried the above steps and the issue persists, try resetting your robot vacuum to its factory settings.
This can clear out any software glitches that may be causing charging problems.
For resetting your Roborock Vacuum:
- Hold the home icon button for 3-5 seconds.
- While holding the home button, press the reset button next to the Wi-Fi LED.
- The lights on the buttons will turn off.
- Continue holding the home button for 5 more seconds.
- The power button will blink, and you’ll hear a message “Restoring the Initial Version, It Will Take About 5 Minutes, Be Patient” confirming the reset process.
- Release the home button.
10. Evaluate the Motherboard
When all other troubleshooting steps, including factory resetting, have failed to resolve the charging issue with your robot vacuum, it becomes crucial to examine the motherboard.
The motherboard functions as the central control unit of the robot and, like any electronic component, can develop problems over time.
Here’s what to do:
| Steps to Identify Damage on DEEBOT Motherboard |
|---|
| 1. Inspection: Examine the motherboard closely for visible signs of damage like burnt capacitors, fuses, or transistors. |
| 2. DIY Repair: If confident, consider replacing damaged parts. Exercise caution and prioritize safety when working with electrical components. |
| 3. Professional Assistance: If unsure or uncomfortable with DIY repairs, contact the manufacturer’s customer support or seek help from a technician. |

You Might Also Like: ILIFE Robot Vacuum Not Charging – 10 Steps To Revive Charging
FAQs
1. Why is my robot cleaner not charging?
If your robot cleaner is not charging, it may be due to several reasons. First, check if the power source is functioning correctly and if the charging dock is properly plugged in.
Ensure that no obstructions or debris are blocking the connection between the robot and the dock. Additionally, inspect the charging contacts on both the robot and the dock for dirt or damage, as this can prevent charging.
2. How do you manually charge Roborock?
To manually charge a Roborock, connect the charging cable directly to the robot’s charging port. Make sure the other end of the cable is plugged into a power source. This bypasses the charging dock and allows you to charge the robot directly from the cable.
3. Why is my Roborock not turning on?
If your Roborock is not turning on, begin by checking its battery level. Ensure it has enough charge to operate. If the battery isn’t the issue, inspect the robot for any obstructions in the wheels or brushes that might be preventing it from starting.
Also, check the power button to confirm it’s functioning correctly.
4. Why is my Xiaomi robot vacuum not charging?
If your Xiaomi robot vacuum is not charging, follow similar troubleshooting steps as mentioned earlier. Verify the power source, check the charging dock for any issues, and clean the charging contacts on both the robot and the dock to ensure a proper connection.
5. How to know if Roborock S7 is charging?
To determine if your Roborock S7 is charging, observe the robot’s display or indicator lights. Typically, when charging, it will display a charging symbol or show the battery icon filling up. If you’re unsure, consult the user manual for specific charging indicators.
6. Why does my Roborock not charge on the dock?
If your Roborock is not charging on the dock, inspect the charging dock for problems such as loose connections or damaged wires. Ensure the dock is on a flat surface and that the robot is properly aligned with the charging contacts on the dock. This will help establish a solid charging connection.
7. My Roborock S7 MaxV Ultra is not charging. What to do?
If your Roborock S7 MaxV Ultra is not charging, first check the power source, examine the charging dock for issues, clean the charging contacts, and ensure the robot is correctly placed on the dock.
If the problem persists, consider reaching out to customer support for further assistance.
8. Why is my Roborock not charging after a reset?
After a reset, it’s possible that your Roborock needs some time to recalibrate. Allow it to charge for a few hours to see if the issue is resolved.
If it still doesn’t charge, follow the earlier troubleshooting steps to ensure there are no physical obstructions or problems with the charging dock.
9. What is error 12 on Roborock?
Error 12 on a Roborock typically indicates a problem with the charging dock or charging system. It could be due to a loose connection, damaged charging contacts, or a malfunctioning component.
To resolve this issue, inspect the dock, clean the contacts, and consider contacting customer support if the error persists.
Our Popular Pick: Roomba Not Charging – Troubleshoot Charging Now

John Paul is a tech enthusiast dedicated to troubleshooting. He is passionate about fixing glitches, simplifying complexities, and empowering others in the digital realm.