In the world of automated cleaning solutions, the ECOVACS DEEBOT is renowned for its efficiency.
Nonetheless, users may encounter the frustrating issue of the ECOVACS DEEBOT not charging.
This guide discusses the potential causes and troubleshooting steps to restore its functionality in no time.
Contents
- 1 8 Common Reasons for ECOVACS DEEBOT Not Charging
- 2 Step-by-Step Guide For ECOVACS DEEBOT Charging Issues
- 3 1. Check DEEBOT Power Status
- 4 2. Verify Docking Station Charging
- 5 3. Align DEEBOT with Docking Station
- 6 4. Clean Charging Contacts
- 7 5. Recall DEEBOT to Docking Station
- 8 6. Avoid Manual Placement
- 9 7. Deactivate the Battery
- 10 8. Perform a Reset
- 11 9. Check for Firmware Updates
- 12 10. Replace the Battery
- 13 FAQs
- 14 1. How can I tell if DEEBOT is charging?
- 15 2. How do I check the power source for my ECOVACS DEEBOT if it is not charging?
- 16 3. What is the best way to clean the charging contacts on my ECOVACS DEEBOT?
- 17 4. How do I reset my ECOVACS DEEBOT if it is not charging?
- 18 5. How can I verify the battery health of my ECOVACS DEEBOT?
- 19 6. What should I do if updating the firmware of my ECOVACS DEEBOT does not fix the charging issue?
- 20 7. Is there a reset button on DEEBOT?
- 21 8. How long does the DEEBOT battery last?
- 22 9. Why is my DEEBOT blinking red?
8 Common Reasons for ECOVACS DEEBOT Not Charging
When encountering charging problems with your ECOVACS DEEBOT, it’s essential to identify the common culprits.
By pinpointing the root cause, you can efficiently troubleshoot and restore your DEEBOT’s charging functionality.
| No. | Common Reasons for ECOVACS DEEBOT Not Charging | Possible Solutions |
|---|---|---|
| 1 | Power Connection Issues | Ensure a secure power cable connection to the charging dock. |
| 2 | Docking Alignment | Properly align the DEEBOT on the charging dock. |
| 3 | Dirty Charging Contacts | Clean dust and debris from both the charging dock and DEEBOT’s contacts. |
| 4 | Battery or Adapter Fault | Check for a malfunctioning battery or faulty power adapter. |
| 5 | Software Glitch | Reboot the DEEBOT or perform a software update if available. |
| 6 | Overheating Protection | Allow the DEEBOT to cool down before attempting to charge again. |
| 7 | Physical Obstructions | Remove any objects obstructing the DEEBOT‘s path to the charging dock. |
| 8 | Battery Life | If the battery’s capacity is diminished, consider a replacement. |
Also, Check: Shark Robot Not Connecting To Wi-Fi? 12 Simple Ways To Fix It
Step-by-Step Guide For ECOVACS DEEBOT Charging Issues
Now, follow these steps to troubleshoot and potentially resolve the issue for seamless cleaning experiences.
1. Check DEEBOT Power Status
Before delving into troubleshooting, it’s crucial to confirm that your DEEBOT is powered on. Begin by opening the top cover and checking if the power button is activated.
If you notice the DEEBOT’s power indicator lit up or its display screen is active, it signifies that the robot is indeed powered on and prepared for further diagnostic steps.
Remember, a DEEBOT that isn’t powered on won’t charge, so this initial check is essential.
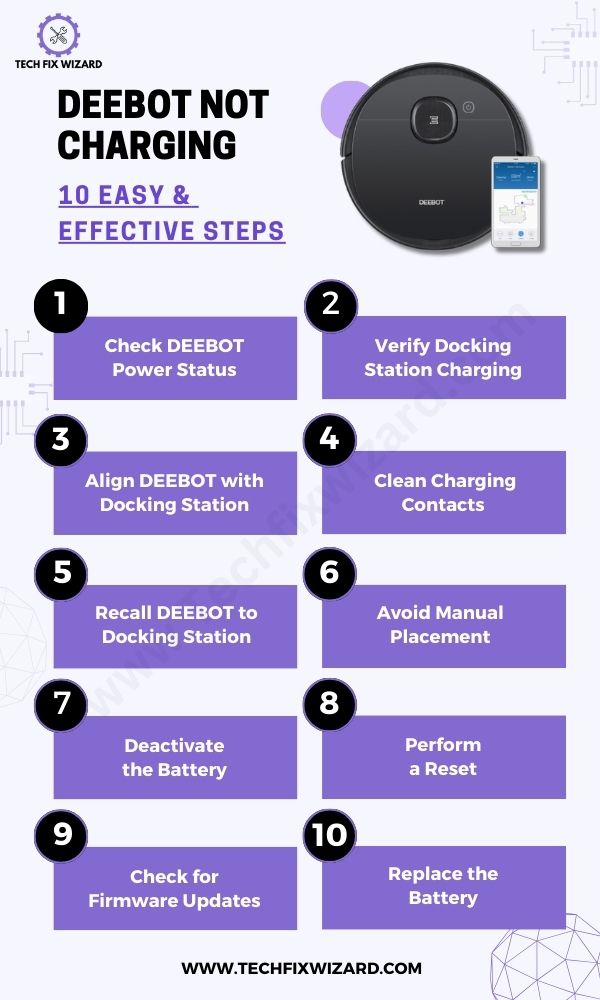
2. Verify Docking Station Charging
Next, it’s essential to ensure that the docking station is receiving the required power. Follow these steps to confirm:
1. Check Power Source:
Begin by checking the power outlet or power cable that supplies the docking station.
Make sure the cable is securely plugged into the power source, and there are no visible signs of damage to the cable or outlet. If you’re using an extension cord or power strip, ensure it’s also functioning properly.
2. Power Indicator:
If the docking station features a power indicator, locate it on the station. The indicator might be a small LED light that illuminates when the station is receiving power.
If the indicator is lit up, it signifies that the docking station is successfully connected to power.

People Also Liked: Shark Robot Vacuum Not Charging? Here’s What You Need to Do
3. Align DEEBOT with Docking Station
1. Clear the Area:
Before placing the DEEBOT on the docking station, ensure the area around the station is clear of any obstacles.
This allows for easy access and prevents any hindrance to the alignment process.
2. Positioning the DEEBOT:
Follow the steps below for proper positioning of the DEEBOT using the ECOVACS app:
- Open the App: Launch the ECOVACS app and log in.
- Connect to DEEBOT: Ensure DEEBOT is connected.
- Access Controls: Find the remote control section.
- Select Docking: Choose “Dock” or “Return to Dock.”
- Observe Navigation: Watch DEEBOT head to the station.
- Confirm Docking: It aligns and charges; you’ll see the app notification.
4. Clean Charging Contacts
After completing the steps above, inspecting the charging contacts for any dirt, dust, debris, or residue is equally important. These particles can disrupt the charging process.

Here’s a guide to effectively clean the charging contacts of DEEBOT Vacuum:
1. Power Off:
Before cleaning, make sure the DEEBOT is powered off and not connected to the docking station.
2. Use a Clean, Dry Cloth:
Take a clean, dry cloth or microfiber cloth and gently wipe the charging contacts on both the DEEBOT and the docking station.
Make sure to be thorough but gentle to avoid damaging the contacts.
3. Inspect for Residue:
Pay close attention to the contacts. If you notice any stubborn residue or dirt that isn’t easily removed, you can lightly dampen a corner of the cloth with alcohol and try again.
However, avoid excessive moisture, as it can damage electronic components.
4. Wait for Dryness:
Allow the contacts to air dry for a moment before reattempting the charging process. It’s important to ensure that both the DEEBOT and the docking station are completely dry before proceeding.
Quick Read: Lefant Robot Vacuum Not Charging – 7 Steps To Fix It
5. Recall DEEBOT to Docking Station
Recalling the DEEBOT to the Docking Station can also aid in resolving the charging issue.
- Use the DEEBOT app or press the Recall button on the docking station.
- This action prompts the DEEBOT to return to the docking station for charging.
- Listen for the DEEBOT’s voice prompt confirming “Start Charging.”
Additionally, observe the flashing AUTO light on the robot, indicating that the charging process has been initiated.

6. Avoid Manual Placement
Although manually placing the DEEBOT on the docking station might seem convenient, it’s advised to refrain from doing so.
Manually positioning the robot can disrupt the precise alignment necessary for optimal charging.
Allow the DEEBOT to autonomously return to the docking station using its navigation capabilities or by using the app.
7. Deactivate the Battery
Note: Deactivated Battery Won’t Charge
It’s important to address the challenge of charging a completely drained battery.
A fully discharged battery might be deactivated and won’t charge immediately. To initiate the reactivation process, connect the DEEBOT to the docking station for a short initial charge of about 15 to 30 minutes.
This initial charge provides enough power for the robot to begin the reactivation sequence.
You Might Also Like: ILIFE Robot Vacuum Not Charging – 10 Steps To Revive Charging
8. Perform a Reset
If the DEEBOT still encounters charging issues, consider performing a reset. Consult your DEEBOT’s user manual for specific reset instructions tailored to your model.
Performing a reset can often rectify minor software glitches that might be affecting the charging process.

Follow the instructions below for the model you own to reset DEEBOT:
1. Locate the Reset Button:
- Turn the vacuum over and find the reset button, typically a small hole with a button inside.
- It’s often located near the edge of the underside, near the wheels or brushes.
2. Power on the Vacuum:
- Make sure the master switch on the vacuum is turned on.
3. Press and Hold the Reset Button:
- Use a thin object like a paperclip or toothpick to press and hold the reset button firmly.
- Continue holding for about 6-10 seconds, or until specific feedback occurs:
- For most models, you’ll hear a musical tone or voice prompt indicating a successful reset.
- Some models may have a flashing light or other visual cue.
4. Release the Button and Wait:
- Once you hear or see the reset confirmation, release the button.
- The vacuum may reboot or power off and on again during the reset process.
5. Re-connect to Wi-Fi (if applicable):
- If your DEEBOT was connected to Wi-Fi, you’ll need to re-establish the connection after a reset.
- Follow the instructions in the ECOVACS app to guide you through the pairing process.
9. Check for Firmware Updates
Outdated firmware can lead to a range of problems, including charging issues. Take a moment to visit the manufacturer’s website or consult the user manual to learn how to check for and apply any available firmware updates.
Maintaining up-to-date firmware can significantly enhance DEEBOT’s overall performance and functionality.
Adhere to the steps below to update the firmware of your DEEBOT:
- Download the ECOVACS Home App from your Google Play Store or Apple Store
- Log in to the ECOVACS Home App.
- Access “Enter Smart Cleaning.”
- Tap the settings icon located in the upper right corner of the screen.
- Choose “About Deebot” > “Update Deebot.”
10. Replace the Battery
If, despite trying all the steps above, the charging issue remains unresolved and you’re considering giving battery replacement a try for your Deebot, you can smoothly proceed by following the steps outlined below for a seamless battery replacement process.
- Turn off your Deebot and unplug it from the power outlet.
- Place your Deebot on a flat surface.
- Locate the battery compartment on the bottom of the Deebot.
- Remove the screws that secure the battery compartment.
- Carefully lift the battery compartment open.
- Disconnect the old battery from the Deebot.
- Connect the new battery to the Deebot.
- Replace the battery compartment and screw it back in place.
- Plug your Deebot back into the power outlet and turn it on.
However, if you’ve exhausted all troubleshooting options including the battery replacement, it’s advisable to reach out to ECOVACS customer service for further assistance.
Our Popular Picks:
- Roomba Not Charging – Troubleshoot Charging Now
- Roborock Not Charging – 10 Effective Steps To Troubleshoot & Fix
FAQs
1. How can I tell if DEEBOT is charging?
When charging, the DEEBOT’s charging indicator light will turn solid red.
2. How do I check the power source for my ECOVACS DEEBOT if it is not charging?
To check the power source for your ECOVACS DEEBOT if it’s not charging, start by making sure the charger is properly plugged in. Then, try connecting it to a different outlet or using a different charging cable.
3. What is the best way to clean the charging contacts on my ECOVACS DEEBOT?
To clean the charging contacts on your ECOVACS DEEBOT, start by unplugging it. Then, use a soft cloth or cotton swab dipped in rubbing alcohol to gently wipe the contacts. Make sure they are dry before plugging it back in.
4. How do I reset my ECOVACS DEEBOT if it is not charging?
To reset your ECOVACS DEEBOT if it’s not charging, try these steps: unplug the charger, remove the battery, wait for a few minutes, reinsert the battery, and then plug in the charger again.
5. How can I verify the battery health of my ECOVACS DEEBOT?
To verify the battery health of your ECOVACS DEEBOT follow these steps: 1) Check if the charging contacts are clean and undamaged. 2) Ensure that the charger and power outlet are working properly.
6. What should I do if updating the firmware of my ECOVACS DEEBOT does not fix the charging issue?
If updating the firmware of your ECOVACS DEEBOT doesn’t fix the charging issue, try resetting the robot by turning it off and on again. If that doesn’t work, contact customer support for further assistance.
Yes, most DEEBOT models have a reset button. It’s usually located near the charging contacts or on the underside of the device.
8. How long does the DEEBOT battery last?
The battery life of a DEEBOT varies by model and usage, but it generally ranges from 1.5 to 2.5 hours on a single charge.
9. Why is my DEEBOT blinking red?
A blinking red light on your DEEBOT indicates a charging error or a fault. Check the user manual for specific troubleshooting steps based on your model.

John Paul is a tech enthusiast dedicated to troubleshooting. He is passionate about fixing glitches, simplifying complexities, and empowering others in the digital realm.