Smart security cameras offer incredible convenience by providing homeowners with peace of mind and real-time monitoring of their surroundings.
However, it can be exceptionally frustrating and concerning when these cameras struggle to establish a reliable connection to the WiFi network.
If your Tapo camera is encountering such difficulties, it can significantly impact the camera’s functionality, leaving you with a compromised sense of security.
In this guide, we will explore the common reasons behind this issue and present a set of comprehensive troubleshooting steps to resolve the Tapo camera not connecting to WiFi.
Contents
- 1 How to Fix Tapo Camera Not Connecting To WiFi Issue?
- 2 1. Verify Tapo Camera Power Status
- 3 2. Check WiFi Signal Strength
- 4 3. Relocate the Router
- 5 4. Double Check WiFi Credentials
- 6 5. Connect to 2.4 GHz WiFi
- 7 6. Verify the Router Settings
- 8 7. Reboot the Router
- 9 8. Reduce Network Interference
- 10 9. Confirm Security Settings Compatibility
- 11 10. Update TP-Link Tapo
- 12 11. Consider Updating Camera Firmware
- 13 12. Try Alternate Device
- 14 13. Disable a VPN or Ad-guard
- 15 14. Reset the Camera
- 16 15. Replace the faulty device
- 17 FAQs
- 18 1. How do I connect the Tapo camera to Wi-Fi?
- 19 2. How do I reset my Tapo camera Wi-Fi?
- 20 3. How do I reconnect my Tapo device to Wi-Fi?
- 21 4. Does the Tapo camera need a Wi-Fi connection?
- 22 5. What Wi-Fi frequency does the Tapo camera use?
- 23 6. How do you use the Tapo camera when away from home?
- 24 7. Why does my Tapo camera keep going offline?
- 25 8. Can I leave my Tapo camera on all the time?
- 26 9. Can I view my Tapo camera from another country?
- 27 10. How do I connect my Tapo camera to mobile data?
- 28 11. What is Tapo camera Wi-Fi?
- 29 12. Does Tapo work remotely?
- 30 13. How is the Tapo camera powered?
- 31 14. How to connect the Tapo camera to the new Wi-Fi?
How to Fix Tapo Camera Not Connecting To WiFi Issue?
Following is a list of carefully curated steps to effectively address the issue of your Tapo Camera not connecting to your WiFi network.
Tapo Camera Not Working – Try These 15 Easy Steps
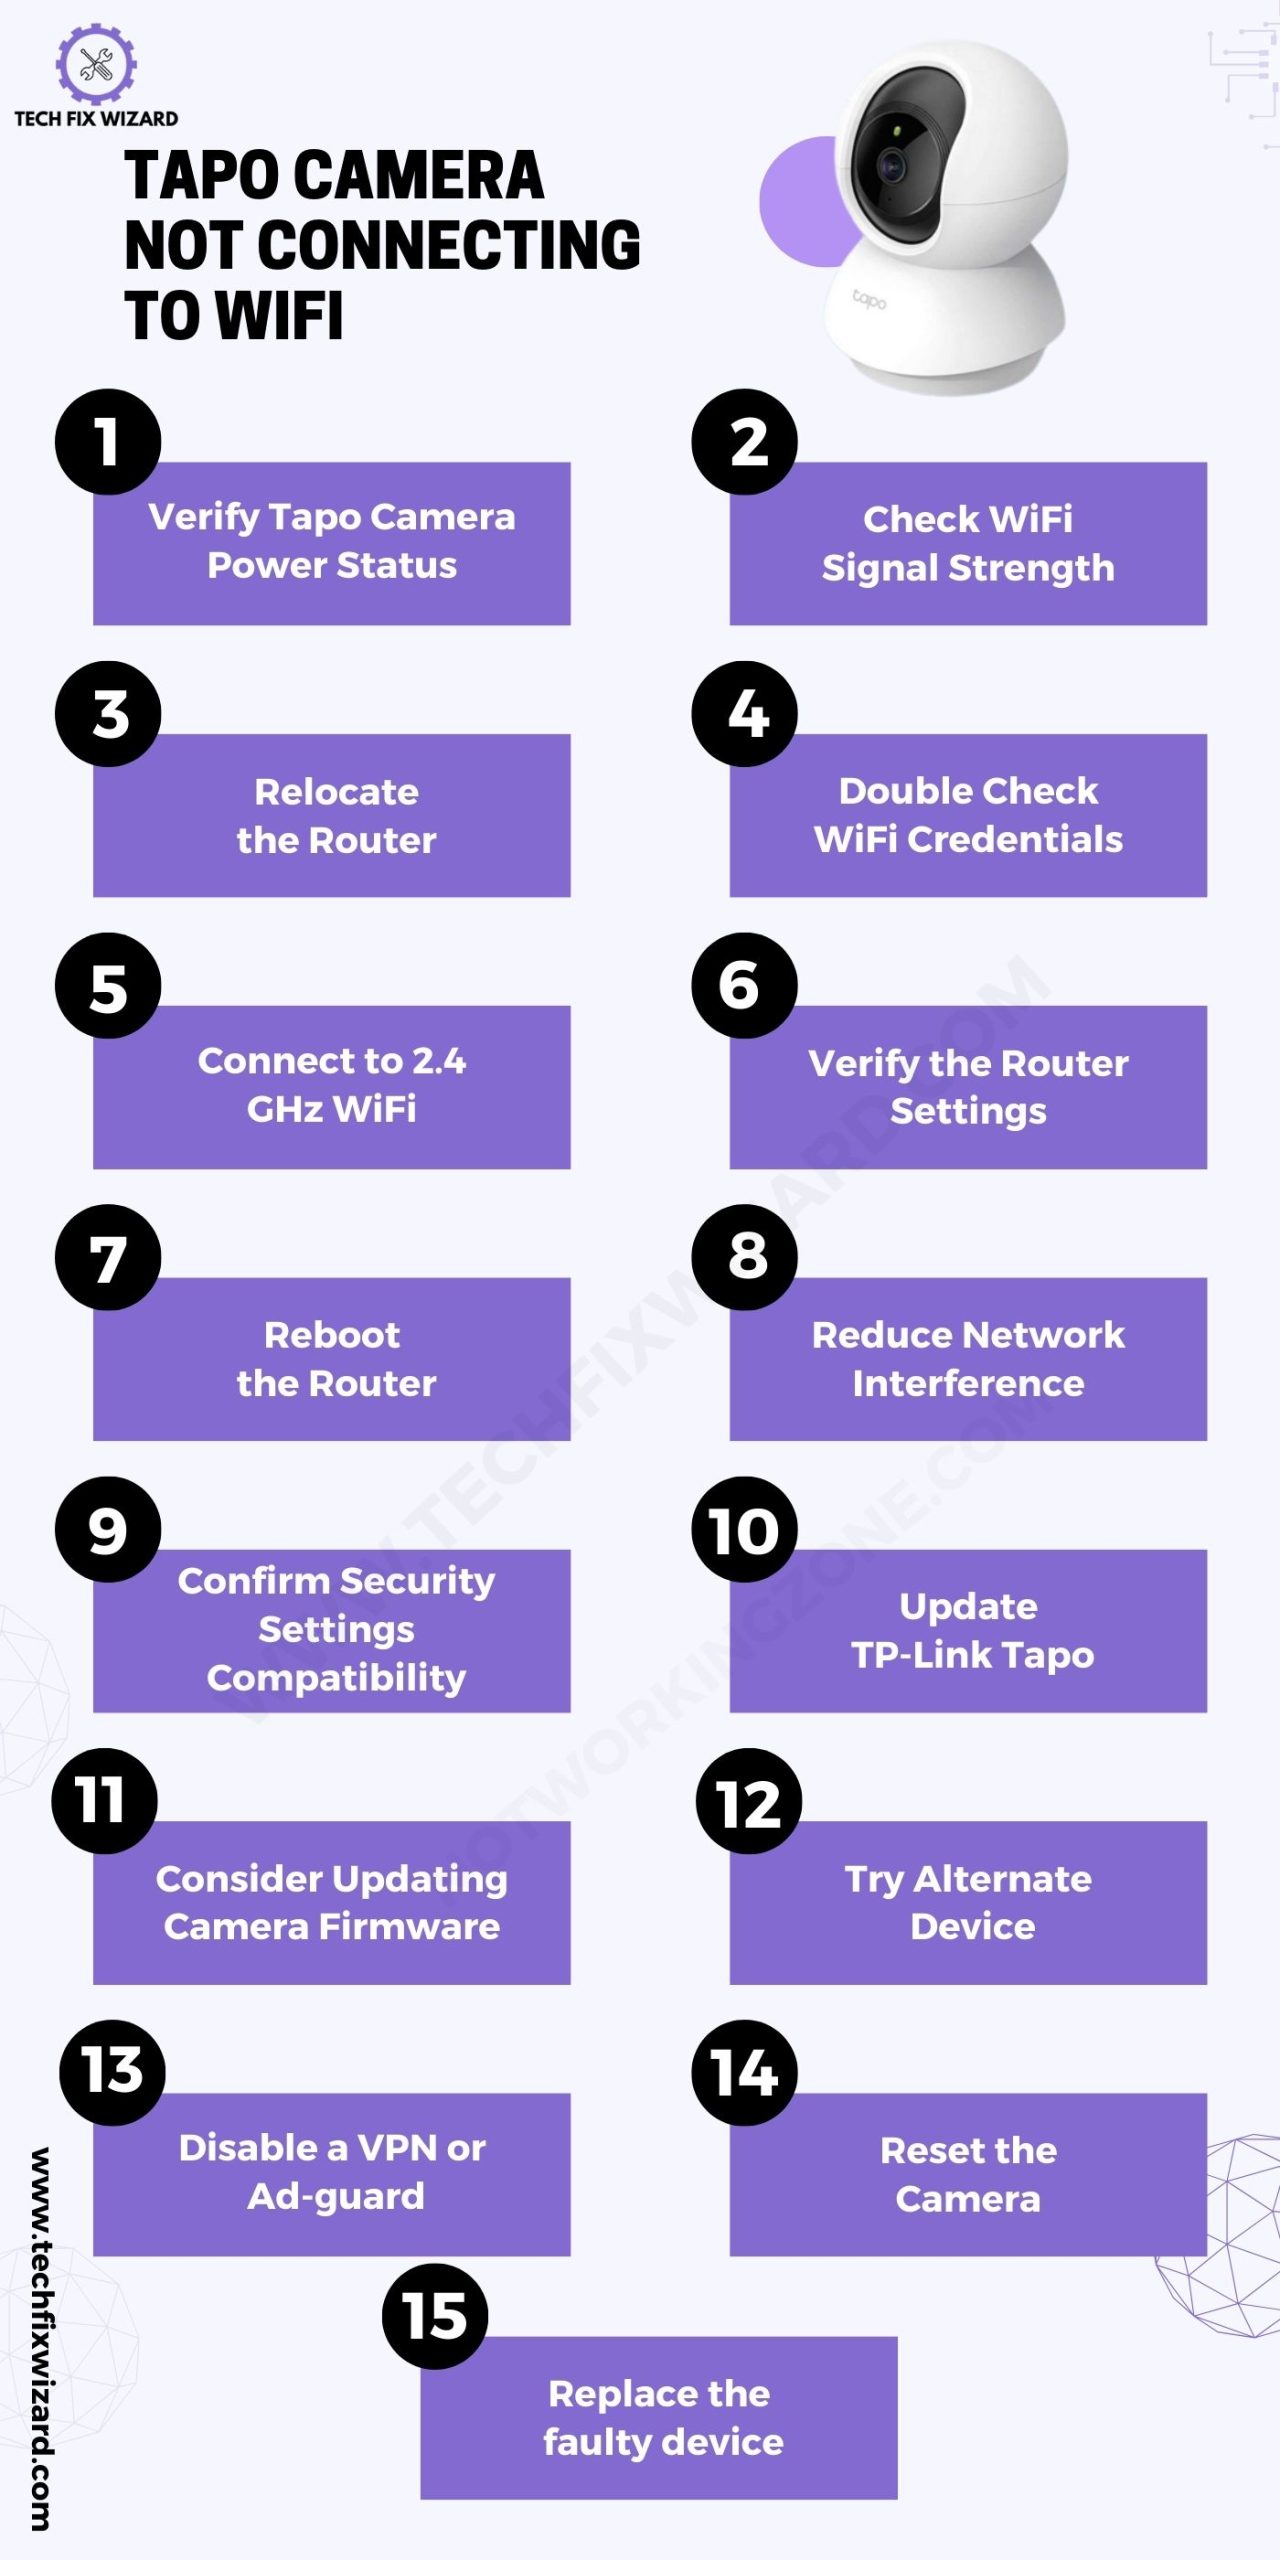
1. Verify Tapo Camera Power Status
To begin, make sure the Tapo Camera is powered on and receiving electricity. Check for the presence of a functioning indicator light on the camera.
If the light is off, you may need to check the power source, such as the power adapter or batteries, to ensure it’s providing power to the camera.
In the case of battery-powered models, ensure the batteries are charged.
2. Check WiFi Signal Strength
The strength of your WiFi signal is very important for a stable camera connection. You can check the signal strength on your mobile device or router settings.
There are various online resources to test the Wi-Fi speed.
3. Relocate the Router
If you’ve confirmed that the WiFi signal is weak, consider moving your router closer to the camera’s location thus reducing obstructions that can weaken the signal.
Proximity to the router enhances signal strength, which is crucial for a reliable connection. You may need to use longer Ethernet cables or Wi-Fi extenders to achieve this.
4. Double Check WiFi Credentials
Accurate WiFi credentials are essential. Double-check that you’ve entered the correct WiFi password during the camera setup process.
A typo or incorrect password can lead to connection failures. If you have any doubts, verify the password with your router settings.
Also Read: Eufy Camera Not Working – 10 Solutions To Consider First
5. Connect to 2.4 GHz WiFi
Ensure that the Tapo Camera is attempting to connect to a 2.4 GHz WiFi network. Most Tapo Cameras are compatible with this frequency, and mistakenly connecting to a 5 GHz network can cause issues.
Review your router settings to confirm the camera’s connection frequency.
6. Verify the Router Settings
Explore your router settings to ensure they are not blocking the camera or necessary ports. Check if any security or firewall settings might restrict the camera’s connection.
Adjust router settings as needed to allow the camera access.
7. Reboot the Router
A simple but effective step is to reboot your router. This can resolve connectivity issues and refresh network settings, which may have become congested over time.
So, to reboot your router:
| # | Steps |
|---|---|
| 1. | Unplug your WiFi router |
| 2. | Wait for about a minute |
| 3. | Then plug it back in |
After rebooting the router, try to connect it to the internet to see if the issue is resolved.
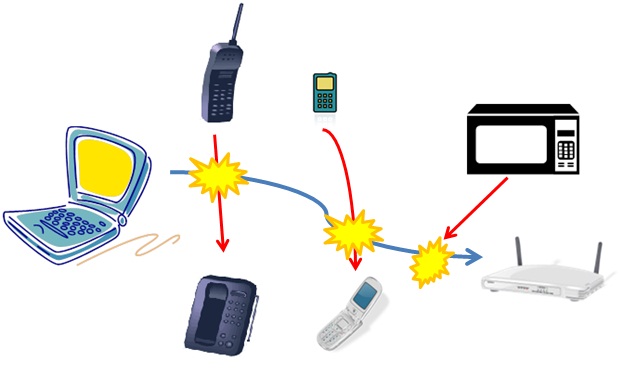
8. Reduce Network Interference
Network interference from other devices can disrupt the camera’s connection. Reduce interference by minimizing the use of other bandwidth-heavy devices while trying to connect the camera.
9. Confirm Security Settings Compatibility
Ensure that the security settings of your WiFi network are compatible with the camera. Common security protocols like WPA2 or WPA3 should work.
Older devices may have trouble with newer security standards, so compatibility is essential for a successful connection.
10. Update TP-Link Tapo
Keep the Tapo app on your mobile device up to date to ensure it’s compatible with the camera. Outdated apps can have bugs that affect the camera’s connectivity.
Check the app store for any available updates and install them.
Also Read: Zmodo Camera Not Connecting – 8 Effective Steps
11. Consider Updating Camera Firmware
Outdated firmware in security cameras can result in various issues including connectivity problems. It’s crucial to keep the camera’s firmware up to date.
To update the camera firmware:
- Install the Tapo app from the Google Play Store.
- Open the Tapo app.
- Add your Tapo camera to the app.
- Tap on the “Me” or “User” icon in the app.
- Access “Firmware Update.”
- Check for available updates for your camera.
- Install the update by tapping “Update” or “Update All” if applicable.
12. Try Alternate Device
If you’re still facing issues, try connecting the camera using a different device if available. This can help identify whether the problem is specific to the initial device.
Ensure the new device has a stable and reliable internet connection.
13. Disable a VPN or Ad-guard
If you use a VPN or ad-blocking software on your mobile device, disable these temporarily, as they can mask your device’s IP address and restrict its access to other devices on your network.
14. Reset the Camera
As a last resort, if the camera isn’t connecting, you can reset it to its default settings. You can reset the camera through a reset button and also through the Tapo App.
To reset the Tapo camera follow the steps below:
By using the RESET Button
- Ensure the camera is powered on.
- Press and hold the Reset button for a minimum of 5 seconds.
- Observe the LED blinking in red during this period.
- The camera will reset and subsequently reboot.
By removing the Camera via the Tapo App
- Go to the Tapo app’s home page.
- Perform a long tap on your camera’s model card.
- Select the minus icon located on the card.
- This action will initiate the removal of the camera from your TP-Link account and restore it to its default settings.
15. Replace the faulty device
If, after attempting all the troubleshooting steps, the camera still doesn’t connect, the camera itself may be faulty.
In this case, reach out to the manufacturer’s customer support or the retailer from which you purchased the camera for further assistance or consider a replacement.
Read Blog Posts:
FAQs
1. How do I connect the Tapo camera to Wi-Fi?
To connect your Tapo camera to Wi-Fi, first plug it in and follow the in-app setup instructions provided by the Tapo app. You’ll need to enter your Wi-Fi network’s name and password during the setup process.
2. How do I reset my Tapo camera Wi-Fi?
To reset your Tapo camera’s Wi-Fi settings, press and hold the reset button on the camera for about 5 seconds until you hear a voice prompt. This will erase the current Wi-Fi configuration, allowing you to set it up with a new network.
3. How do I reconnect my Tapo device to Wi-Fi?
To reconnect a Tapo device to Wi-Fi, access the device settings in the Tapo app, select the device you want to reconnect, and follow the instructions for Wi-Fi setup.
4. Does the Tapo camera need a Wi-Fi connection?
Yes, Tapo cameras require a Wi-Fi connection to function. They use your Wi-Fi network to transmit video and receive commands from the Tapo app.
5. What Wi-Fi frequency does the Tapo camera use?
Tapo cameras typically use the 2.4GHz Wi-Fi frequency band for connectivity. Ensure your router supports 2.4GHz for a successful connection.
6. How do you use the Tapo camera when away from home?
To use your Tapo camera when away from home, ensure it’s connected to Wi-Fi, and then access the live feed and control features through the Tapo app on your smartphone or tablet, as long as you have an internet connection.
7. Why does my Tapo camera keep going offline?
There are several reasons for a Tapo camera to go offline, including Wi-Fi issues, power problems, or a weak signal. Ensure your Wi-Fi network is stable, and the camera is receiving power properly to prevent this.
8. Can I leave my Tapo camera on all the time?
Yes, you can leave your Tapo camera on all the time as long as it’s properly powered and connected to Wi-Fi. It will continue to monitor and record video as needed.
9. Can I view my Tapo camera from another country?
Yes, you can view your Tapo camera from another country using the Tapo app, as long as both the camera and the device you’re using to access it have an internet connection.
10. How do I connect my Tapo camera to mobile data?
To connect your Tapo camera to mobile data, enable the mobile hotspot feature on your smartphone and connect the camera to the hotspot’s Wi-Fi network during setup.
11. What is Tapo camera Wi-Fi?
Tapo camera Wi-Fi refers to the Wi-Fi network to which your Tapo camera is connected, allowing it to transmit video and receive remote commands through the Tapo app.
12. Does Tapo work remotely?
Yes, Tapo devices, including cameras, can be used remotely. You can access and control them from anywhere with an internet connection using the Tapo app.
13. How is the Tapo camera powered?
Tapo cameras are typically powered using a standard electrical outlet. They come with an AC adapter for power and connect to Wi-Fi for operation.
14. How to connect the Tapo camera to the new Wi-Fi?
To connect your Tapo camera to a new Wi-Fi network:
- Open the Tapo app.
- Select the camera.
- Access camera settings.
- Find the option to change Wi-Fi.
- Enter new network details.
- Wait for the connection.

John Paul is a tech enthusiast dedicated to troubleshooting. He is passionate about fixing glitches, simplifying complexities, and empowering others in the digital realm.