The BMW X5 E53 is a popular luxury SUV known for its performance, comfort, and advanced features.
However, encountering a battery not charging issue can be frustrating and disrupt your driving experience. But worry not!
In this guide, we will explore some common symptoms of a BMW X5 E53 battery not charging, along with troubleshooting steps to help resolve the issue.
Contents
- 1 3 Symptoms of BMW X5 E53 Battery Not Charging
- 2 Troubleshooting BMW X5 E53 Battery Not Charging
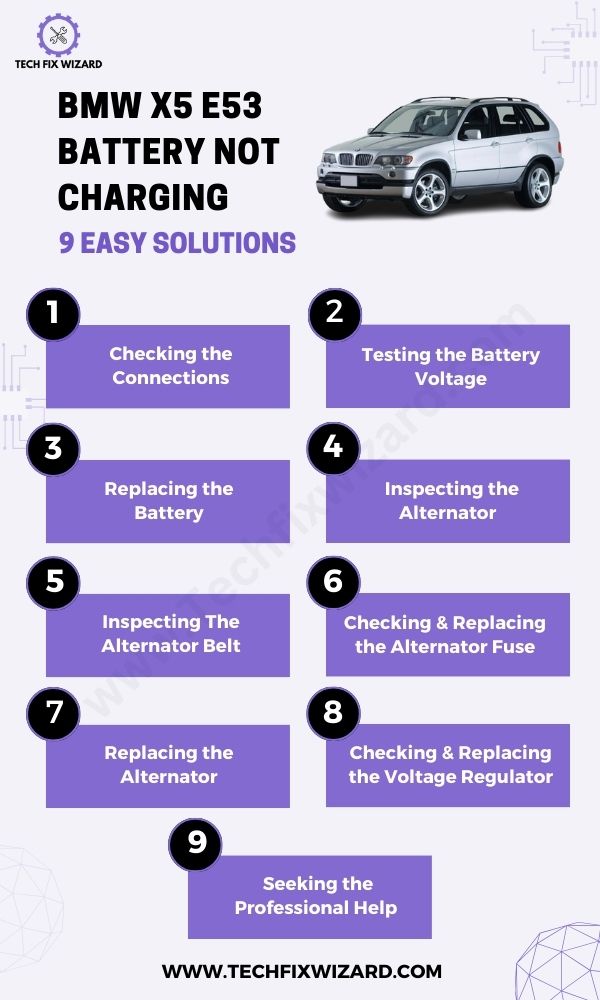
- 3 1. Checking the Connections
- 4 2. Testing the Battery Voltage
- 5 3. Replacing the Battery
- 6 4. Inspecting the Alternator
- 7 5. Inspecting The Alternator Belt
- 8 6. Checking & Replacing the Alternator Fuse
- 9 7. Replacing the Alternator
- 10 8. Checking & Replacing the Voltage Regulator
- 11 9. Seeking the Professional Help
- 12 FAQs
- 13 Why is my BMW X5 E53 battery not charging?
- 14 How can I determine if it’s the battery or the alternator causing the charging problem?
- 15 What are the common signs of a faulty alternator in a BMW X5 E53?
- 16 Can a bad voltage regulator cause the battery not to charge in a BMW X5 E53?
- 17 How can I test the voltage regulator in my BMW X5 E53?
- 18 What should I do if I have a dead battery in my BMW X5 E53?
- 19 How often should I replace the battery in my BMW X5 E53?
- 20 Can a loose or corroded battery terminal cause charging issues?
- 21 Are there any recalls or known issues related to battery charging in the BMW X5 E53?
- 22 Can a faulty battery sensor affect the charging system in a BMW X5 E53?
- 23 When should I seek professional help to diagnose and fix the battery not charging issue in my BMW X5 E53?
- 24 Is it possible to charge the battery manually in a BMW X5 E53?
- 25 Official References & Resources
3 Symptoms of BMW X5 E53 Battery Not Charging
Identifying the indications of an inadequate electrical charging system in a BMW X5 E53 can be crucial in diagnosing and resolving the issue.
| Symptom | Possible Cause |
|---|---|
| 1. Battery warning light on the dashboard | Charging system malfunction |
| 2. Dimming or flickering headlights | Insufficient battery charge or faulty alternator |
| 3. Difficulty starting the vehicle | Low battery charge or alternator failure |
If you suspect that your BMW X5 E53 has a battery not charging issue, it is important to take action sooner rather than later.
Ignoring these symptoms can lead to further problems down the line, such as a completely dead battery or even damage to other electrical components in your car.
Troubleshooting BMW X5 E53 Battery Not Charging
Following is the systematic approach towards solving the BMW X5 E53 Battery not charging issue, starting with checking the connections and gradually moving on to testing and inspecting other components.
By methodically addressing the problem, you can restore the proper charging functionality to your BMW X5 E53.
You Might Also Like: BMW X5 Hybrid Not Charging – 5 Steps To Resolve It
1. Checking the Connections
When troubleshooting a BMW X5 E53 battery not charging issue, one of the first and most important steps is to check the connections.
Faulty or loose connections can disrupt the charging process and result in a drained battery or even damage to other electrical components in your car.
– Checking the Battery Connections:
- Turn off the engine and open the hood of your BMW X5 E53.
- Locate the battery, usually positioned in the engine compartment.
- Inspect the battery terminals for any signs of corrosion or loose connections.
- If there is corrosion, clean the battery terminals using a wire brush and a mixture of baking soda and water.
- Ensure that the battery terminals are tightly secured to the battery posts.
- Check the battery cables for any signs of damage or wear.
- If there are any damaged cables, replace them with new ones.
- Reconnect the battery cables, starting with the positive (+) terminal followed by the negative (-) terminal.
- Ensure the connections are secure and free of any looseness.
- Start the engine and monitor the battery charging system to see if the issue is resolved.
– Checking the Alternator Connections:
- Turn off the engine and open the hood of your BMW X5 E53.
- Locate the alternator, typically mounted on the engine.
- Inspect the electrical connections on the alternator.
- Check that the wires are securely attached and free from corrosion or damage.
- Carefully examine the positive and negative terminals of the alternator.
- Ensure the terminals are clean and tightly connected.
- Gently tighten any loose connections using appropriate tools.
- If there is significant corrosion, clean the terminals using a wire brush or battery terminal cleaner.
2. Testing the Battery Voltage
After checking the battery connection next step is to test the battery voltage. As testing the battery voltage is an essential step in determining if there are any issues with your vehicle’s charging system.
Here are the 9 simple steps to test the battery voltage of your BMW X5 E53.
- Turn off the car engine before starting the battery voltage test.
- Locate the positive (+) and negative (-) terminals on the car battery.
- Use a digital multimeter to measure the voltage between the positive and negative terminals.
- Set the multimeter to the appropriate voltage range, usually DC voltage.
- Connect the multimeter’s red probe to the positive terminal and the black probe to the negative terminal of the battery.
- Read the voltage displayed on the multimeter. It should indicate the battery’s voltage level.
- A fully charged battery typically reads around 12.6 volts or higher.
- If the voltage reading is significantly lower, the battery may need to be charged or replaced.
- Make sure to disconnect the multimeter probes from the battery terminals after taking the reading.
The table below shows what you should expect from different battery voltages:
| Battery Voltage | State of Charge |
|---|---|
| -12.6V | Fully charged |
| -12.4V | About 75% charged |
| -12.2V | About 50% charged |
| -11.9V | About 25% charged |
| -Below 11.8V | Discharged |
3. Replacing the Battery
To replace the battery you can follow the steps given below in the table:
| Step | Heading | Description |
|---|---|---|
| 1. | Prepare the Vehicle | Ensure the vehicle is turned off and the keys are removed from the ignition.
Wear appropriate safety gear. |
| 2. | Locate the Battery | Consult the owner’s manual to find the specific location of the battery, typically in the trunk or under the rear seat. |
| 3. | Disconnect the Negative Terminal | Using a wrench or socket, loosen the nut on the negative terminal and remove the cable from the battery post. |
| 4. | Disconnect the Positive Terminal | Using the same procedure as the negative terminal, disconnect the positive terminal and secure the cable away from the battery. |
| 5. | Remove the Battery Hold-down Bracket | If present, remove the hold-down bracket securing the battery. |
| 6. | Remove the Old Battery | Lift the old battery carefully out of its tray and set it aside. |
| 7. | Clean the Battery Tray | Inspect the battery tray for corrosion or debris.
Clean if necessary using a battery cleaning solution and wire brush. |
| 8. | Install the New Battery | Place the new battery in the tray, ensuring it is positioned correctly.
Reinstall the hold-down bracket if applicable. |
| 9. | Connect the Positive Terminal | Attach the positive cable to the positive terminal of the new battery and tighten the terminal nut securely. |
| 10. | Connect the Negative Terminal | Connect the negative cable to the negative terminal of the new battery and tighten the terminal nut. |
| 11. | Double-Check Connections | Ensure both battery terminals are securely fastened and free from any looseness. |
| 12. | Test the Charging System | Start the vehicle and check if the battery is charging properly.
Monitor voltage and warning lights. |
Also Read: BMW X5 Battery Not Charging – 6 Troubleshooting Steps
4. Inspecting the Alternator
After testing the battery the next crucial step of the troubleshooting process is to inspect the alternator.
Follow the steps below to check the condition of the alternator.
- Open the hood of your BMW X5 E53 and locate the alternator. It is usually positioned near the front of the engine.
- Visually inspect the alternator for any signs of physical damage, such as cracks, dents, or loose connections.
- Check the electrical connections on the alternator. Ensure that all wires are securely attached and free from corrosion.
- Examine the alternator belt for wear or damage. Look for cracks, fraying, or signs of excessive looseness or tightness.
- Inspect the pulley attached to the alternator. It should rotate smoothly without wobbling or making unusual noises.
- Check the voltage regulator, if accessible. Look for any signs of overheating or burning, such as discoloration or a burnt smell.
- If any issues or abnormalities are found during the inspection, consider seeking professional assistance to diagnose and resolve the problem.
5. Inspecting The Alternator Belt
Now it’s time for you to take a closer look at your BMW X5 E53’s alternator belt/Serpentine belt and ensure that it’s in good condition.
The alternator belt is responsible for transferring power from the engine to the alternator, which charges your car battery.
If the alternator belt is worn out or damaged, it can cause your battery not to charge properly.
- Locate the alternator belt under the hood of your BMW X5 E53.
- Inspect the belt for any signs of wear or damage, such as cracks, fraying, or glazing on the surface.
- Check the tension of the belt to ensure it is neither too loose nor too tight.
- If you notice any signs of wear or damage, or if the belt tension is incorrect, consider replacing the alternator belt.
A new alternator belt will help maintain proper charging function and prevent further issues with your car battery.
6. Checking & Replacing the Alternator Fuse
The alternator fuse is an essential component of the charging system that helps regulate voltage and protect the battery from overcharging.
If you notice that your battery is not charging properly, it may be time to check the alternator fuse.
To check if the alternator fuse needs replacement, follow these steps:
- Locate the Fuse Box: The fuse box in a BMW X5 E53 is typically located under the hood of the vehicle. Consult your owner’s manual for the specific location of the fuse box.
- Open the Fuse Box: Remove the cover of the fuse box to gain access to the fuses. This may involve using a latch, screws, or clips depending on the design of the fuse box.
- Find the Alternator Fuse: Look for the fuse labeled “Alternator” or refer to the fuse diagram on the inside of the fuse box cover or in your owner’s manual to identify the alternator fuse.
- Visually examine the alternator fuse: Check if the metal strip inside the fuse is intact or if it appears broken, burnt, or discolored. A blown fuse will have a gap in the metal strip or may appear blackened.
- Test the Fuse with a Multimeter (Optional): If you have a multimeter, set it to the continuity or resistance mode and touch the probes to the metal contacts on the fuse. If the multimeter beeps or shows a low resistance reading, the fuse is intact. If there is no beep or a high resistance reading, the fuse is blown.
- Determine if the Fuse Needs Replacement: Based on the inspection and multimeter test (if performed), determine if the alternator fuse needs replacement. If the fuse appears damaged or fails the multimeter test, it needs to be replaced. However, if the fuse looks fine and passes the multimeter test, it may not be the cause of the charging issue.
Replacing the alternator fuse in your BMW X5 E53 is a straightforward process that can be done with just a few tools.
- Locate the Fuse BoxOpen the hood of your vehicle and find the fuse box.
- Identify the Alternator FuseLook for the alternator fuse, which should be labeled under the fuse box cover or in the owner’s manual.
- Remove the Old FuseUse needle-nose pliers to carefully remove the old alternator fuse
- Select a Replacement FuseChoose a replacement fuse with a matching amperage rating. Refer to the table below for guidance.
- Insert the new alternator fuse into the appropriate slot in the fuse box.
- Secure the Fuse Box CoverEnsure that the fuse box cover is properly closed and secured.
- Test the BatteryTest the battery again to check if it begins charging properly after the fuse replacement.
| Fuse Rating (A) | Compatible Models |
|---|---|
| 80 | 2000-2003 |
| 120 | 2004-2006 |
| 150 | 2006-2010 |
You Might Also Be Interested: BMW Wallbox Not Charging – 6 Effective Solutions To Try
7. Replacing the Alternator
| Step | Description |
|---|---|
| 1. Prepare for the Replacement | Ensure that the engine is off and the battery is disconnected to prevent any electrical mishaps during the process. |
| 2. Locate the Alternator | In the engine compartment, find the alternator, which is typically situated on the top or side of the engine. |
| 3. Disconnect the Battery | Remove the negative (black) cable from the battery terminal to disconnect the electrical connection. |
| 4. Remove the Drive Belt | Loosen the tension on the drive belt by using a wrench or a belt tensioner tool.
Slip the belt off the alternator pulley. |
| 5. Disconnect Electrical Connections | Detach the electrical connectors from the alternator by carefully releasing the clips or screws holding them in place. |
| 6. Remove Mounting Bolts | Locate the mounting bolts that secure the alternator to the engine or bracket.
Use the appropriate socket or wrench to loosen and remove these bolts. |
| 7. Take Out the Alternator | Gently maneuver the alternator out of its mounting position, ensuring not to damage any surrounding components or wiring. |
| 8. Install the New Alternator | Position the new alternator in place and tighten the mounting bolts securely. |
| 9. Reconnect Electrical Connections | Attach the electrical connectors to the new alternator, ensuring they are securely fastened. |
| 10. Install the Drive Belt | Place the drive belt back onto the alternator pulley.
Use a wrench or belt tensioner tool to apply tension to the belt, ensuring it is properly aligned and seated on all pulleys. |
| 11. Reconnect the Battery | Attach the negative (black) cable back to the battery terminal, ensuring a tight connection. |
| 12. Test the Charging System | Start the engine and monitor the battery charging status using a voltmeter or by observing the battery charge indicator on the dashboard.
Ensure that the battery is now charging properly. |
8. Checking & Replacing the Voltage Regulator
Checking and replacing the voltage regulator in your BMW X5 E53 is another important step in troubleshooting and maintaining a properly functioning charging system.
The voltage regulator plays a crucial role in regulating the electrical output from the alternator to ensure the battery receives the correct charging voltage.
By following the steps outlined in the table below, you can inspect, test, and replace the voltage regulator if necessary.
| Step | Description |
|---|---|
| 1. Locate the voltage regulator | In most BMW X5 E53 models, the voltage regulator is integrated into the alternator. |
| 2. Disconnect the battery | Safely disconnect the negative terminal of the battery to prevent any electrical mishaps. |
| 3. Remove the alternator | Unbolt the alternator from its mounting bracket and carefully disconnect the electrical connections. |
| 4. Identify the voltage regulator | Once the alternator is removed, locate the voltage regulator on the back or side of the unit. |
| 5. Inspect the voltage regulator | Check for any visible signs of damage, such as burnt components or loose connections. |
| 6. Test the voltage regulator | Use a multimeter to measure the output voltage of the regulator and compare it to the manufacturer’s specifications. |
| 7. Replace the voltage regulator | If the voltage regulator is faulty or not within the acceptable range, replace it with a new one. |
| 8. Reinstall the alternator | Attach the new voltage regulator to the alternator and reconnect all electrical connections. |
| 9. Reconnect the battery | Reattach the negative terminal of the battery, ensuring a secure connection. |
| 10. Test the charging system | Start the engine and verify if the battery is charging properly. Monitor for any warning lights or abnormal behavior. |
Our Popular Posts:
- BMW Not Charging iPhone – 7 Quick & Easy Solutions
- BMW Wireless Not Charging – 9 Causes And Easy Fixes
9. Seeking the Professional Help
If you have followed the troubleshooting steps mentioned above and are still experiencing issues with your BMW X5 E53’s battery not charging, it is advisable to seek professional assistance.
Professional mechanics and technicians have the expertise, tools, and diagnostic equipment to accurately identify and resolve complex electrical problems.
They can perform in-depth inspections, conduct advanced tests, and provide the necessary repairs or replacements to ensure your charging system is functioning optimally.
Seeking professional help can save you time, prevent further damage, and ensure the long-term reliability of your vehicle.
FAQs
Why is my BMW X5 E53 battery not charging?
There can be several reasons for a battery not charging in a BMW X5 E53, including a faulty alternator, worn-out battery, damaged wiring, or issues with the voltage regulator.
How can I determine if it’s the battery or the alternator causing the charging problem?
You can have the battery tested at a service center or use a battery tester.
Additionally, testing the output voltage of the alternator while the engine is running can help determine if it’s functioning properly.
What are the common signs of a faulty alternator in a BMW X5 E53?
Some common signs of a faulty alternator include dimming headlights, battery warning lights on the dashboard, electrical system malfunctions, or difficulty starting the vehicle.
Can a bad voltage regulator cause the battery not to charge in a BMW X5 E53?
Yes, a faulty voltage regulator can disrupt the charging process and result in a battery not charging.
The voltage regulator regulates the electrical output of the alternator.
How can I test the voltage regulator in my BMW X5 E53?
Testing the voltage regulator requires specialized equipment and knowledge. It is recommended to have a qualified mechanic or technician perform this test.
What should I do if I have a dead battery in my BMW X5 E53?
If you have a dead battery, you can try jump-starting the vehicle using jumper cables or call for roadside assistance.
It is important to address the underlying charging issue to prevent future battery problems.
How often should I replace the battery in my BMW X5 E53?
Battery lifespan varies depending on usage and environmental conditions. On average, a car battery lasts 3-5 years.
However, regular maintenance and inspections are crucial to determine when replacement is needed.
Can a loose or corroded battery terminal cause charging issues?
Yes, loose or corroded battery terminals can disrupt the electrical flow and cause charging problems.
Regularly inspect and clean the battery terminals to ensure a secure connection.
It is recommended to check with your local BMW dealership or the manufacturer’s website for any recalls or known issues related to battery charging in your specific BMW X5 E53 model and production year.
Can a faulty battery sensor affect the charging system in a BMW X5 E53?
Yes, a faulty battery sensor can impact the charging system as it provides important information to the vehicle’s electrical system.
A malfunctioning sensor can lead to inaccurate readings and charging issues.
When should I seek professional help to diagnose and fix the battery not charging issue in my BMW X5 E53?
If you are unable to identify or resolve the issue on your own, it is advisable to seek assistance from a qualified mechanic or authorized BMW service center.
They have the expertise and tools to diagnose and repair complex electrical problems.
Is it possible to charge the battery manually in a BMW X5 E53?
While it is technically possible to charge the battery manually using an external battery charger, it is important to address the underlying issue causing the battery not to charge.
Manually charging the battery temporarily may provide power, but it won’t fix the underlying problem.
People Also Liked:
Official References & Resources
Our research for providing accurate information about BMW involved a thorough analysis of official resources, including the official BMW website owner’s manuals, technical specifications, and relevant support forums.
Our research and data gathering involved thorough analysis of the official websites, including:

John Paul is a tech enthusiast dedicated to troubleshooting. He is passionate about fixing glitches, simplifying complexities, and empowering others in the digital realm.